The rise of artificial intelligence (AI) has created opportunities to improve the customer experience in the contact center space. Machine learning (ML) technologies continually improve and power the contact center customer experience by providing solutions for capabilities like self-service bots, live call analytics, and post-call analytics. Self-service bots integrated with your call center can help you achieve decreased wait times, intelligent routing, decreased time to resolution through self-service functions or data collection, and improved net promoter scores (NPS). Some examples include a customer calling to check on the status of an order and receiving an update from a bot, or a customer needing to submit a renewal for a license and the chatbot collecting the necessary information, which it hands over to an agent for processing.
With Amazon Lex bots, you can use conversational AI capabilities to enable these capabilities within your call center. Amazon Lex uses automatic speech recognition (ASR) and natural language understanding (NLU) to understand the customer’s needs and assist them on their journey.
Genesys Cloud (an omni-channel orchestration and customer relationship platform) provides a contact center platform in a public cloud model that enables quick and simple integration of AWS Contact Center Intelligence (AWS CCI) to transform the modern contact center from a cost center into a profit center. As part of AWS CCI, Genesys Cloud integrates with Amazon Lex, which enables self-service, intelligent routing, and data collection capabilities.
When exploring AWS CCI capabilities with Amazon Lex and Genesys Cloud, you may be unsure of where to start on your bot design journey. To assist those who may be starting with a blank canvas, Amazon Lex provides the Amazon Lex automated chatbot designer. The automated chatbot designer uses ML to provide an initial bot design that you can then refine and launch conversational experiences faster based on your current call transcripts. With the automated chatbot designer, Amazon Lex customers and partners have a straightforward and intuitive way of designing chatbots and can reduce bot design time from weeks to hours. However, the automated chatbot designer requires transcripts to be in a certain format that is not aligned to Genesys Cloud transcript exports.
In this post, we show how you can implement an architecture using Amazon EventBridge, Amazon Simple Storage Service (Amazon S3), and AWS Lambda to automatically collect, transform, and load your Genesys call transcripts in the required format for the Amazon Lex automated chatbot designer. You can then run the automated chatbot designer on your transcripts, be given recommendations for bot design, and streamline your bot design journey.
Solution overview
The following diagram illustrates the solution architecture.

The solution workflow consists of the following steps:
- Genesys Cloud sends iterative transcripts events to your EventBridge event bus.
- Lambda receives the iterative transcripts from EventBridge, determines when a conversation is complete, and invokes the Transcript API within Genesys Cloud and drops the full transcript in an S3 bucket.
- When a new full transcript is uploaded to Amazon S3, Lambda converts the Genesys Cloud formatted transcript into the required format for the Amazon Lex automated chatbot designer and copies it to an S3 bucket.
- The Amazon Lex automated chatbot designer uses ML to build an initial bot design based on the provided Genesys Cloud transcripts.
Prerequisites
Before you deploy the solution, you must complete the following prerequisites:
- Set up your Genesys Cloud CX account and make sure that you are able to log in. For more information on setting up your account, refer to the Genesys documentation.
- Make sure that the right permissions are set for enabling and publishing transcripts from Genesys. For more information on setting up the required permissions, refer to Roles and permissions overview.
- If PCI and PII encryption is required for transcription, make sure it is set up in Genesys. For more information on setting up the required permissions, refer to Are interaction transcripts encrypted when stored in the cloud.
- Set up an AWS account with the appropriate permissions.
Deploy the Genesys EventBridge integration
To enable the EventBridge integration with Genesys Cloud, complete the following steps:
- Log in to the Genesys Cloud environment.
- Choose Admin, Integrations, Add Integrations, and Amazon EventBridge Source.
- On the Configuration tab, provide the following information:
- For AWS Account ID, enter your AWS account ID.
- For AWS Account Region, enter the Region where you want EventBridge to be set up.
- For Event Source Suffix, enter a suffix (for example,
genesys-eb-poc-demo).
- Save your configuration.

- On the EventBridge console, choose Integration in the navigation pane, then choose Partner event sources.
There should be an event source listed with a name like aws.partner/genesys.com/…/genesys-eb-poc-demo.

- Select the partner event source and choose Associate with event bus.
The status changes from Pending to Active. This sets up the EventBridge configuration for Genesys.

Next, you set up OAuth2 credentials in Genesys Cloud for authorizing the API call to get the final transcript.
- Navigate to the Genesys Cloud instance.
- Choose Admin, Integrations, and OAuth.
- Choose Add Client.
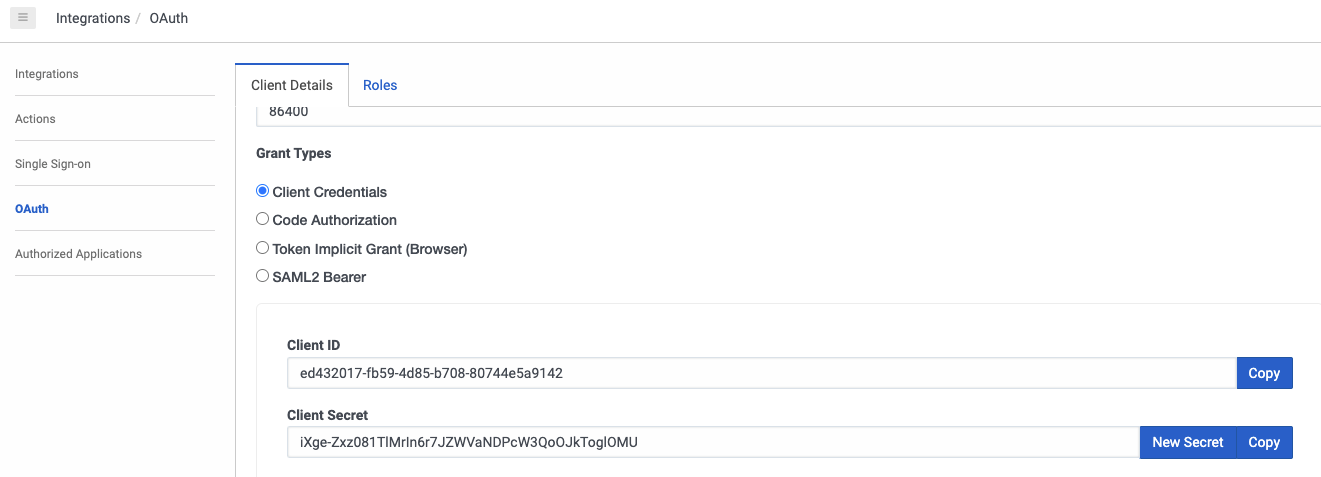
- On the Client Details tab, provide the following information:
- For App Name, enter a name (for example,
TranscriptInvoke-creds). - For Grant Types, select Client Credentials.
- For App Name, enter a name (for example,
Make sure you’re using the right role that has access to invoke the Transcribe APIs.
- Choose Save.
This generates new values for Client ID and Client Secret. Copy these values to use in the next section, where you configure the template for the solution.
Deploy the solution
After you have set up the Genesys EventBridge integration, you can deploy an AWS Serverless Application Model (AWS SAM) template, which deploys the remainder of the architecture. To deploy the solution in your account, complete the following steps:
- Install AWS SAM if not installed already. For instructions, refer to Installing the AWS SAM CLI.
- Download the GitHub repo and unzip to your directory.
- Navigate to the
genesys-to-lex-automated-chatbot-designerfolder and run the following commands:
The first command builds the source of your application. The second command packages and deploys your application to AWS, with a series of prompts:
- Stack Name – Enter the name of the stack to deploy to AWS CloudFormation. This should be unique to your account and Region; a good starting point is something matching your project name.
- AWS Region – Enter the Region you want to deploy your app to. Make sure it is deployed in the same Region as the EventBridge event bus.
- Parameter GenesysBusname – Enter the bus name created when you configured the Genesys integration. The pattern of the bus name should look like
aws.partner/genesys.com/*. - Parameter ClientId – Enter the client ID you copied earlier.
- Parameter ClientSecret – Enter the client secret you copied earlier.
- Parameter FileNamePrefix – Change the default file name prefix for the target transcript file in the raw S3 bucket or keep the default.
- Parameter GenCloudEnv – Enter is the cloud environment for the specific Genesys organization. Genesys is available in more than 15 Regions worldwide as of this writing, so this value is mandatory and should point to the environment where your organization is created in Genesys (for example,
usw2.pure.cloud). - Confirm changes before deploy – If set to yes, any change sets will be shown to you before deployment for manual review. If set to no, the AWS SAM CLI will automatically deploy application changes.
- Allow SAM CLI IAM role creation – Many AWS SAM templates, including this example, create AWS Identity and Access Management (IAM) roles required for the Lambda functions included to access AWS services. By default, these are scoped down to the minimum required permissions. To deploy a CloudFormation stack that creates or modifies IAM roles, you must provide the
CAPABILITY_IAMvalue for capabilities. If permission isn’t provided through this prompt, to deploy this example, you must explicitly pass--capabilities CAPABILITY_IAMto thesam deploycommand. - Save arguments to samconfig.toml – If set to yes, your choices will be saved to a configuration file inside the project, so that in the future you can rerun
sam deploywithout parameters to deploy changes to your application.
After you deploy your AWS SAM application in your account, you can test that Genesys transcripts are being sent to your account and being transformed into the required format for the Amazon Lex automated chatbot designer.
Make a test call to validate the solution
After you have set up the Genesys EventBridge integration and deployed the preceding AWS SAM template, you can make test calls and validate that files are ending up in the S3 bucket for transformed files. At a high level, you need to perform the following steps:
- Make a test call to your Genesys instance to create a transcript.
- Wait a few minutes and check the TransformedTranscript bucket for the output.
Run the automated chatbot designer
After you have a few days’ worth of transcripts saved in Amazon S3, you can run the automated chatbot designer through the Amazon Lex console using the steps in this section. For more information about the minimum and maximum amount of turns for the service, refer to Prepare transcripts.
- On the Amazon Lex V2 console, choose Bots in the navigation pane.
- Choose Create bot.

- Select Start with transcripts as the creation method.
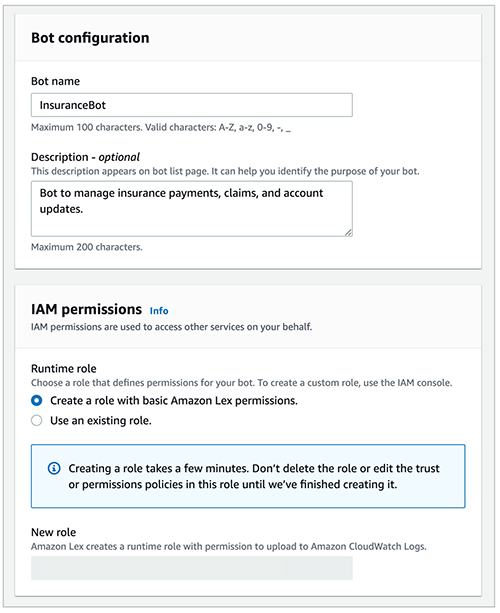
- Give the bot a name (for this example,
InsuranceBot) and provide an optional description. - Select Create a role with basic Amazon Lex permissions and use this as your runtime role.
- After you fill out the other fields, choose Next to proceed to the language configuration.
- Choose the language and voice for your interaction.

- Specify the Amazon S3 location of the transcripts that the solution has converted for you.
- Add additional local paths if you have a specific a folder structure within your S3 bucket.

- Apply a filter (date range) for your input transcripts.

- Choose Done.
You can use the status bar on the Amazon S3 console to track the analysis. Within a few hours, the automated chatbot designer surfaces a chatbot design that includes user intents, sample phrases associated with those intents, and a list of all the information required to fulfill them. The amount of time it takes to complete training depends on several factors, including the volume of transcripts and the complexity of the conversations. Typically, 600 lines of transcript are analyzed every minute.
- Choose Review to view the intents and slot types discovered by the automated chatbot designer.

The Intents tab lists all the intents along with sample phrases and slots, and the Slot types tab provides a list of all the slot types along with slot type values.

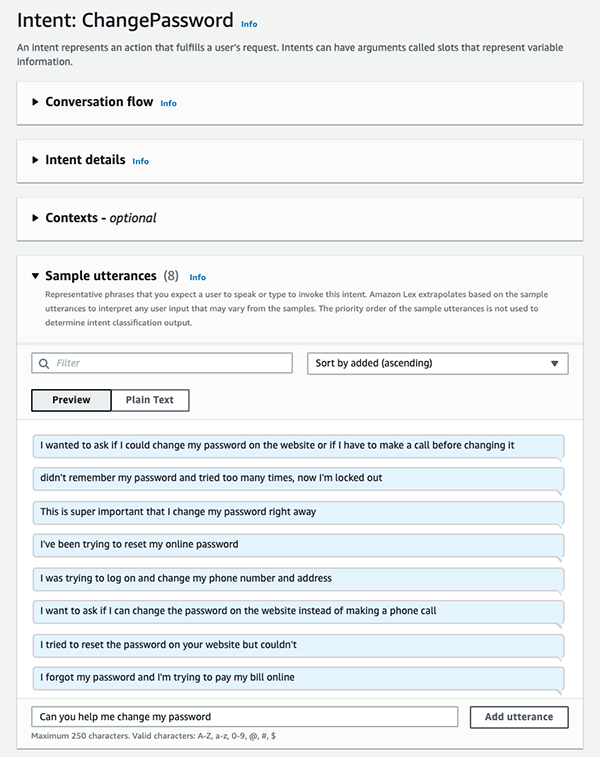
- Choose any of the intents to review the sample utterances and slots. For example, in the following screenshot, we choose
ChangePasswordto view the utterances.
- Choose the Associated transcripts tab to review the conversations used to identify the intents.

- After you review the results, select the intents and slot types relevant to your use case and choose Add.
This adds the selected intents and slot types to the bot. You can now iterate on this design by making changes such as adding prompts, merging intents or slot types, and renaming slots.
You have now used the Amazon Lex automated chatbot designer to identify common intents, utterances mapped to those intents, and information that the chatbot needs to collect to fulfill certain business functions.
Clean up
When you’re finished, clean up your resources by using the following command within the AWS SAM CLI:
Conclusion
This post showed you how to use the Genesys Cloud CX and EventBridge integration to send your Genesys CX transcripts to your AWS account, transform them, and use them with the Amazon Lex automated chatbot designer to create sample bots, intents, utterances, and slots. This architecture can help first-time AWS CCI users and current AWS CCI users onboard more chatbots using the Genesys CX and Amazon Lex integration, or in continuous improvement opportunities where you may want to compare your current intent design to that outputted by the Amazon Lex automated chatbot designer. For more information about other AWS CCI capabilities, see Contact Center Intelligence.
About the Authors
 Joe Morotti is a Solutions Architect at Amazon Web Services (AWS), helping Enterprise customers across the Midwest US. He has held a wide range of technical roles and enjoy showing customer’s art of the possible. In his free time, he enjoys spending quality time with his family exploring new places and over analyzing his sports team’s performance.
 Anand Bose is a Senior Solutions Architect at Amazon Web Services, supporting ISV partners who build business applications on AWS. He is passionate about creating differentiated solutions that unlock customers for cloud adoption. Anand lives in Dallas, Texas and enjoys travelling.
 Teri Ferris is responsible for architecting great customer experiences alongside business partners, leveraging Genesys technology solutions that enable Experience Orchestration for contact centers. In her role she advises on solution architecture, integrations, IVR, routing, reporting analytics, self-service, AI, outbound, mobile capabilities, omnichannel, social channels, digital, unified communications (UCaaS), and analytics and how they can streamline the customer experience. Before Genesys, she held senior leadership roles at Human Resources, Payroll, and Learning Management companies, including overseeing the Contact Center.
- SEO Powered Content & PR Distribution. Get Amplified Today.
- PlatoData.Network Vertical Generative Ai. Empower Yourself. Access Here.
- PlatoAiStream. Web3 Intelligence. Knowledge Amplified. Access Here.
- PlatoESG. Carbon, CleanTech, Energy, Environment, Solar, Waste Management. Access Here.
- PlatoHealth. Biotech and Clinical Trials Intelligence. Access Here.
- Source: https://aws.amazon.com/blogs/machine-learning/expedite-your-genesys-cloud-amazon-lex-bot-design-with-the-amazon-lex-automated-chatbot-designer/

