Radiology reports are comprehensive, lengthy documents that describe and interpret the results of a radiological imaging examination. In a typical workflow, the radiologist supervises, reads, and interprets the images, and then concisely summarizes the key findings. The summarization (or impression) is the most important part of the report because it helps clinicians and patients focus on the critical contents of the report that contain information for clinical decision-making. Creating a clear and impactful impression involves much more effort than simply restating the findings. The entire process is therefore laborious, time consuming, and prone to error. It often takes years of training for doctors to accumulate enough expertise in writing concise and informative radiology report summarizations, further highlighting the significance of automating the process. Additionally, automatic generation of report findings summarization is critical for radiology reporting. It enables translation of reports into human readable language, thereby alleviating the patients’ burden of reading through lengthy and obscure reports.
To solve this problem, we propose the use of generative AI, a type of AI that can create new content and ideas, including conversations, stories, images, videos, and music. Generative AI is powered by machine learning (ML) models—very large models that are pre-trained on vast amounts of data and commonly referred to as foundation models (FMs). Recent advancements in ML (specifically the invention of the transformer-based neural network architecture) have led to the rise of models that contain billions of parameters or variables. The proposed solution in this post uses fine-tuning of pre-trained large language models (LLMs) to help generate summarizations based on findings in radiology reports.
This post demonstrates a strategy for fine-tuning publicly available LLMs for the task of radiology report summarization using AWS services. LLMs have demonstrated remarkable capabilities in natural language understanding and generation, serving as foundation models that can be adapted to various domains and tasks. There are significant benefits to using a pre-trained model. It reduces computation costs, reduces carbon footprints, and allows you to use state-of-the-art models without having to train one from scratch.
Our solution uses the FLAN-T5 XL FM, using Amazon SageMaker JumpStart, which is an ML hub offering algorithms, models, and ML solutions. We demonstrate how to accomplish this using a notebook in Amazon SageMaker Studio. Fine-tuning a pre-trained model involves further training on specific data to improve performance on a different but related task. This solution involves fine-tuning the FLAN-T5 XL model, which is an enhanced version of T5 (Text-to-Text Transfer Transformer) general-purpose LLMs. T5 reframes natural language processing (NLP) tasks into a unified text-to-text-format, in contrast to BERT-style models that can only output either a class label or a span of the input. It is fine-tuned for a summarization task on 91,544 free-text radiology reports obtained from the MIMIC-CXR dataset.
Overview of solution
In this section, we discuss the key components of our solution: choosing the strategy for the task, fine-tuning an LLM, and evaluating the results. We also illustrate the solution architecture and the steps to implement the solution.
Identify the strategy for the task
There are various strategies to approach the task of automating clinical report summarization. For example, we could use a specialized language model pre-trained on clinical reports from scratch. Alternatively, we could directly fine-tune a publicly available general-purpose language model to perform the clinical task. Using a fine-tuned domain-agnostic model may be necessary in settings where training a language model from scratch is too costly. In this solution, we demonstrate the latter approach of using a FLAN -T5 XL model, which we fine-tune for the clinical task of summarization of radiology reports. The following diagram illustrates the model workflow.

A typical radiology report is well-organized and succinct. Such reports often have three key sections:
- Background – Provides general information about the demographics of the patient with essential information about the patient, clinical history, and relevant medical history and details of exam procedures
- Findings – Presents detailed exam diagnosis and results
- Impression – Concisely summarizes the most salient findings or interpretation of the findings with an assessment of significance and potential diagnosis based on the observed abnormalities
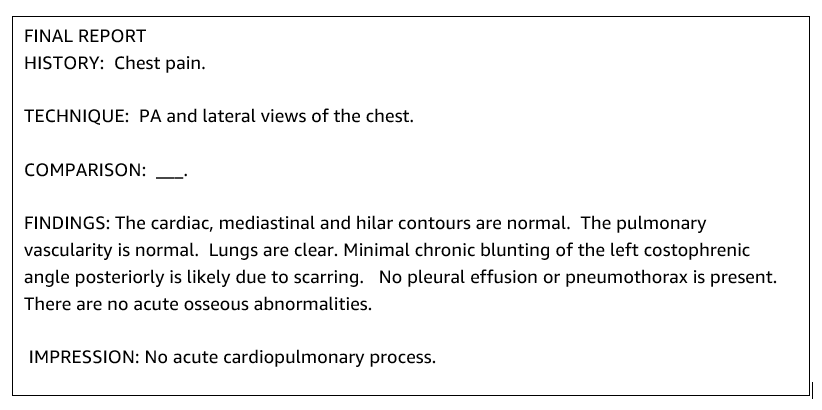
Using the findings section in the radiology reports, the solution generates the impression section, which corresponds to the doctors’ summarization. The following figure is an example of a radiology report .
Fine-tune a general-purpose LLM for a clinical task
In this solution, we fine-tune a FLAN-T5 XL model (tuning all the parameters of the model and optimizing them for the task). We fine-tune the model using the clinical domain dataset MIMIC-CXR, which is a publicly available dataset of chest radiographs. To fine-tune this model through SageMaker Jumpstart, labeled examples must be provided in the form of {prompt, completion} pairs. In this case, we use pairs of {Findings, Impression} from the original reports in MIMIC-CXR dataset. For inferencing, we use a prompt as shown in the following example:
![]()
The model is fine-tuned on an accelerated computing ml.p3.16xlarge instance with 64 virtual CPUs and 488 GiB memory. For validation, 5% of the dataset was randomly selected. The elapsed time of the SageMaker training job with fine-tuning was 38,468 seconds (approximately 11 hours).
Evaluate the results
When the training is complete, it’s critical to evaluate the results. For a quantitative analysis of the generated impression, we use ROUGE (Recall-Oriented Understudy for Gisting Evaluation), the most commonly used metric for evaluating summarization. This metric compares an automatically produced summary against a reference or a set of references (human-produced) summary or translation. ROUGE1 refers to the overlap of unigrams (each word) between the candidate (the model’s output) and reference summaries. ROUGE2 refers to the overlap of bigrams (two words) between the candidate and reference summaries. ROUGEL is a sentence-level metric and refers to the longest common subsequence (LCS) between two pieces of text. It ignores newlines in the text. ROUGELsum is a summary-level metric. For this metric, newlines in the text aren’t ignored but are interpreted as sentence boundaries. The LCS is then computed between each pair of reference and candidate sentences, and then union-LCS is computed. For aggregation of these scores over a given set of reference and candidate sentences, the average is computed.
Walkthrough and architecture
The overall solution architecture as shown in the following figure primarily consists of a model development environment that uses SageMaker Studio, model deployment with a SageMaker endpoint, and a reporting dashboard using Amazon QuickSight.

In the following sections, we demonstrate fine-tuning an LLM available on SageMaker JumpStart for summarization of a domain-specific task via the SageMaker Python SDK. In particular, we discuss the following topics:
- Steps to set up the development environment
- An overview of the radiology report datasets on which the model is fine-tuned and evaluated
- A demonstration of fine-tuning the FLAN-T5 XL model using SageMaker JumpStart programmatically with the SageMaker Python SDK
- Inferencing and evaluation of the pre-trained and fine-tuned models
- Comparison of results from pre-trained model and fine-tuned models
The solution is available in the Generating Radiology Report Impression using generative AI with Large Language Model on AWS GitHub repo.
Prerequisites
To get started, you need an AWS account in which you can use SageMaker Studio. You will need to create a user profile for SageMaker Studio if you don’t already have one.
The training instance type used in this post is ml.p3.16xlarge. Note that the p3 instance type requires a service quota limit increase.
The MIMIC CXR dataset can be accessed through a data use agreement, which requires user registration and completion of a credentialing process.
Set up the development environment
To set up your development environment, you create an S3 bucket, configure a notebook, create endpoints and deploy the models, and create a QuickSight dashboard.
Create an S3 bucket
Create an S3 bucket called llm-radiology-bucket to host the training and evaluation datasets. This will also be used to store the model artifact during model development.
Configure a notebook
Complete the following steps:
- Launch SageMaker Studio from either the SageMaker console or the AWS Command Line Interface (AWS CLI).
For more information about onboarding to a domain, see Onboard to Amazon SageMaker Domain.
- Create a new SageMaker Studio notebook for cleaning the report data and fine-tuning the model. We use an ml.t3.medium 2vCPU+4GiB notebook instance with a Python 3 kernel.
- Within the notebook, install the relevant packages such as
nest-asyncio,IPyWidgets(for interactive widgets for Jupyter notebook), and the SageMaker Python SDK:
For inferencing the pre-trained and fine-tuned models, create an endpoint and deploy each model in the notebook as follows:
- Create a model object from the Model class that can be deployed to an HTTPS endpoint.
- Create an HTTPS endpoint with the model object’s pre-built
deploy()method:
Create a QuickSight dashboard
Create a QuickSight dashboard with an Athena data source with inference results in Amazon Simple Storage Service (Amazon S3) to compare the inference results with the ground truth. The following screenshot shows our example dashboard. 
Radiology report datasets
The model is now fine-tuned, all the model parameters are tuned on 91,544 reports downloaded from the MIMIC-CXR v2.0 dataset. Because we used only the radiology report text data, we downloaded just one compressed report file (mimic-cxr-reports.zip) from the MIMIC-CXR website. Now we evaluate the fine-tuned model on 2,000 reports (referred to as the dev1 dataset) from the separate held out subset of this dataset. We use another 2,000 radiology reports (referred to as dev2) for evaluating the fine-tuned model from the chest X-ray collection from the Indiana University hospital network. All the datasets are read as JSON files and uploaded to the newly created S3 bucket llm-radiology-bucket. Note that all the datasets by default don’t contain any Protected Health Information (PHI); all sensitive information is replaced with three consecutive underscores (___) by the providers.
Fine-tune with the SageMaker Python SDK
For fine-tuning, the model_id is specified as huggingface-text2text-flan-t5-xl from the list of SageMaker JumpStart models. The training_instance_type is set as ml.p3.16xlarge and the inference_instance_type as ml.g5.2xlarge. The training data in JSON format is read from the S3 bucket. The next step is to use the selected model_id to extract the SageMaker JumpStart resource URIs, including image_uri (the Amazon Elastic Container Registry (Amazon ECR) URI for the Docker image), model_uri (the pre-trained model artifact Amazon S3 URI), and script_uri (the training script):
Also, an output location is set up as a folder within the S3 bucket.
Only one hyperparameter, epochs, is changed to 3, and the rest all are set as default:
The training metrics such as eval_loss (for validation loss), loss (for training loss), and epoch to be tracked are defined and listed:
We use the SageMaker JumpStart resource URIs (image_uri, model_uri, script_uri) identified earlier to create an estimator and fine-tune it on the training dataset by specifying the S3 path of the dataset. The Estimator class requires an entry_point parameter. In this case, JumpStart uses transfer_learning.py. The training job fails to run if this value is not set.
This training job can take hours to complete; therefore, it’s recommended to set the wait parameter to False and monitor the training job status on the SageMaker console. Use the TrainingJobAnalytics function to keep track of the training metrics at various timestamps:
Deploy inference endpoints
In order to draw comparisons, we deploy inference endpoints for both the pre-trained and fine-tuned models.
First, retrieve the inference Docker image URI using model_id, and use this URI to create a SageMaker model instance of the pre-trained model. Deploy the pre-trained model by creating an HTTPS endpoint with the model object’s pre-built deploy() method. In order to run inference through SageMaker API, make sure to pass the Predictor class.
Repeat the preceding step to create a SageMaker model instance of the fine-tuned model and create an endpoint to deploy the model.
Evaluate the models
First, set the length of summarized text, number of model outputs (should be greater than 1 if multiple summaries need to be generated), and number of beams for beam search.
Construct the inference request as a JSON payload and use it to query the endpoints for the pre-trained and fine-tuned models.
Compute the aggregated ROUGE scores (ROUGE1, ROUGE2, ROUGEL, ROUGELsum) as described earlier.
Compare the results
The following table depicts the evaluation results for the dev1 and dev2 datasets. The evaluation result on dev1 (2,000 findings from the MIMIC CXR Radiology Report) shows approximately 38 percentage points improvement in the aggregated average ROUGE1 and ROUGE2 scores compared to the pre-trained model. For dev2, an improvement of 31 percentage points and 25 percentage points is observed in ROUGE1 and ROUGE2 scores. Overall, fine-tuning led to an improvement of 38.2 percentage points and 31.3 percentage points in ROUGELsum scores for the dev1 and dev2 datasets, respectively.
|
Evaluation Dataset |
Pre-trained Model | Fine-tuned model | ||||||
| ROUGE1 | ROUGE2 | ROUGEL | ROUGELsum | ROUGE1 | ROUGE2 | ROUGEL | ROUGELsum | |
dev1 |
0.2239 | 0.1134 | 0.1891 | 0.1891 | 0.6040 | 0.4800 | 0.5705 | 0.5708 |
dev2 |
0.1583 | 0.0599 | 0.1391 | 0.1393 | 0.4660 | 0.3125 | 0.4525 | 0.4525 |
The following box plots depict the distribution of ROUGE scores for the dev1 and dev2 datasets evaluated using the fine-tuned model.
 |
 |
(a): dev1 |
(b): dev2 |
The following table shows that ROUGE scores for the evaluation datasets have approximately the same median and mean and therefore are symmetrically distributed.
| Datasets | Scores | Count | Mean | Std Deviation | Minimum | 25% percentile | 50% percentile | 75% percentile | Maximum |
dev1 |
ROUGE1 | 2000.00 | 0.6038 | 0.3065 | 0.0000 | 0.3653 | 0.6000 | 0.9384 | 1.0000 |
| ROUGE 2 | 2000.00 | 0.4798 | 0.3578 | 0.0000 | 0.1818 | 0.4000 | 0.8571 | 1.0000 | |
| ROUGE L | 2000.00 | 0.5706 | 0.3194 | 0.0000 | 0.3000 | 0.5345 | 0.9101 | 1.0000 | |
| ROUGELsum | 2000.00 | 0.5706 | 0.3194 | 0.0000 | 0.3000 | 0.5345 | 0.9101 | 1.0000 | |
dev2 |
ROUGE 1 | 2000.00 | 0.4659 | 0.2525 | 0.0000 | 0.2500 | 0.5000 | 0.7500 | 1.0000 |
| ROUGE 2 | 2000.00 | 0.3123 | 0.2645 | 0.0000 | 0.0664 | 0.2857 | 0.5610 | 1.0000 | |
| ROUGE L | 2000.00 | 0.4529 | 0.2554 | 0.0000 | 0.2349 | 0.4615 | 0.7500 | 1.0000 | |
| ROUGE Lsum | 2000.00 | 0.4529 | 0.2554 | 0.0000 | 0.2349 | 0.4615 | 0.7500 | 1.0000 |
Clean up
To avoid incurring future charges, delete the resources you created with the following code:
Conclusion
In this post, we demonstrated how to fine-tune a FLAN-T5 XL model for a clinical domain-specific summarization task using SageMaker Studio. To increase the confidence, we compared the predictions with ground truth and evaluated the results using ROUGE metrics. We demonstrated that a model fine-tuned for a specific task returns better results than a model pre-trained on a generic NLP task. We would like to point out that fine-tuning a general-purpose LLM eliminates the cost of pre-training altogether.
Although the work presented here focuses on chest X-ray reports, it has the potential to be expanded to bigger datasets with varied anatomies and modalities, such as MRI and CT, for which radiology reports might be more complex with multiple findings. In such cases, radiologists could generate impressions in order of criticality and include follow-up recommendations. Furthermore, setting up a feedback loop for this application would enable radiologists to improve the performance of the model over time.
As we showed in this post, the fine-tuned model generates impressions for radiology reports with high ROUGE scores. You can try to fine-tune LLMs on other domain-specific medical reports from different departments.
About the authors
 Dr. Adewale Akinfaderin is a Senior Data Scientist in Healthcare and Life Sciences at AWS. His expertise is in reproducible and end-to-end AI/ML methods, practical implementations, and helping global healthcare customers formulate and develop scalable solutions to interdisciplinary problems. He has two graduate degrees in Physics and a Doctorate degree in Engineering.
 Priya Padate is a Senior Partner Solutions Architect with extensive expertise in Healthcare and Life Sciences at AWS. Priya drives go-to-market strategies with partners and drives solution development to accelerate AI/ML-based development. She is passionate about using technology to transform the healthcare industry to drive better patient care outcomes.
 Ekta Walia Bhullar, PhD, is a senior AI/ML consultant with AWS Healthcare and Life Sciences (HCLS) professional services business unit. She has extensive experience in the application of AI/ML within the healthcare domain, especially in radiology. Outside of work, when not discussing AI in radiology, she likes to run and hike.
- SEO Powered Content & PR Distribution. Get Amplified Today.
- PlatoData.Network Vertical Generative Ai. Empower Yourself. Access Here.
- PlatoAiStream. Web3 Intelligence. Knowledge Amplified. Access Here.
- PlatoESG. Automotive / EVs, Carbon, CleanTech, Energy, Environment, Solar, Waste Management. Access Here.
- PlatoHealth. Biotech and Clinical Trials Intelligence. Access Here.
- ChartPrime. Elevate your Trading Game with ChartPrime. Access Here.
- BlockOffsets. Modernizing Environmental Offset Ownership. Access Here.
- Source: https://aws.amazon.com/blogs/machine-learning/automatically-generate-impressions-from-findings-in-radiology-reports-using-generative-ai-on-aws/

