Amazon SageMaker Studio offers a broad set of fully managed integrated development environments (IDEs) for machine learning (ML) development, including JupyterLab, Code Editor based on Code-OSS (Visual Studio Code Open Source), and RStudio. It provides access to the most comprehensive set of tools for each step of ML development, from preparing data to building, training, deploying, and managing ML models. You can launch fully managed JuptyerLab with pre-configured SageMaker Distribution in seconds to work with your notebooks, code, and data. The flexible and extensible interface of SageMaker Studio allows you to effortlessly configure and arrange ML workflows, and you can use the AI-powered inline coding companion to quickly author, debug, explain, and test code.
In this post, we take a closer look at the updated SageMaker Studio and its JupyterLab IDE, designed to boost the productivity of ML developers. We introduce the concept of Spaces and explain how JupyterLab Spaces enable flexible customization of compute, storage, and runtime resources to improve your ML workflow efficiency. We also discuss our shift to a localized execution model in JupyterLab, resulting in a quicker, more stable, and responsive coding experience. Additionally, we cover the seamless integration of generative AI tools like Amazon CodeWhisperer and Jupyter AI within SageMaker Studio JupyterLab Spaces, illustrating how they empower developers to use AI for coding assistance and innovative problem-solving.
Introducing Spaces in SageMaker Studio
The new SageMaker Studio web-based interface acts as a command center for launching your preferred IDE and accessing your Amazon SageMaker tools to build, train, tune, and deploy models. In addition to JupyterLab and RStudio, SageMaker Studio now includes a fully managed Code Editor based on Code-OSS (Visual Studio Code Open Source). Both JupyterLab and Code Editor can be launched using a flexible workspace called Spaces.

A Space is a configuration representation of a SageMaker IDE, such as JupyterLab or Code Editor, designed to persist regardless of whether an application (IDE) associated with the Space is actively running or not. A Space represents a combination of a compute instance, storage, and other runtime configurations. With Spaces, you can create and scale the compute and storage for your IDE up and down as you go, customize runtime environments, and pause and resume coding anytime from anywhere. You can spin up multiple such Spaces, each configured with a different combination of compute, storage, and runtimes.

When a Space is created, it is equipped with an Amazon Elastic Block Store (Amazon EBS) volume, which is used to store users’ files, data, caches, and other artifacts. It’s attached to a ML compute instance whenever a Space is run. The EBS volume ensures that user files, data, cache, and session states are consistently restored whenever the Space is restarted. Importantly, this EBS volume remains persistent, whether the Space is in a running or stopped state. It will continue to persist until the Space is deleted.
Additionally, we have introduced the bring-your-own file system feature for users who wish to share environments and artifacts across different Spaces, users, or even domains. This enables you to optionally equip your Spaces with your own Amazon Elastic File System (Amazon EFS) mount, facilitating the sharing of resources across various workspaces.
Creating a Space
Creating and launching a new Space is now quick and straightforward. It takes just a few seconds to set up a new Space with fast launch instances and less than 60 seconds to run a Space. Spaces are equipped with predefined settings for compute and storage, managed by administrators. SageMaker Studio administrators can establish domain-level presets for compute, storage, and runtime configurations. This setup enables you to quickly launch a new space with minimal effort, requiring only a few clicks. You also have the option to modify a Space’s compute, storage, or runtime configurations for further customization.
It’s important to note that creating a Space requires updating the SageMaker domain execution role with a policy like the following example. You need to grant your users permissions for private spaces and user profiles necessary to access these private spaces. For detailed instructions, refer to Give your users access to private spaces.
To create a space, complete the following steps:
- In SageMaker Studio, choose JupyterLab on the Applications menu.
- Choose Create JupyterLab space.

- For Name, enter a name for your Space.
- Choose Create space.

- Choose Run space to launch your new Space with default presets or update the configuration based on your requirements.

Reconfiguring a Space
Spaces are designed for users to seamlessly transition between different compute types as needed. You can begin by creating a new Space with a specific configuration, primarily consisting of compute and storage. If you need to switch to a different compute type with a higher or lower vCPU count, more or less memory, or a GPU-based instance at any point in your workflow, you can do so with ease. After you stop the Space, you can modify its settings using either the UI or API via the updated SageMaker Studio interface and then restart the Space. SageMaker Studio automatically handles the provisioning of your existing Space to the new configuration, requiring no extra effort on your part.
Complete the following steps to edit an existing space:
- On the space details page, choose Stop space.

- Reconfigure the compute, storage, or runtime.
- Choose Run space to relaunch the space.

Your workspace will be updated with the new storage and compute instance type you requested.
The new SageMaker Studio JupyterLab architecture
The SageMaker Studio team continues to invent and simplify its developer experience with the release of a new fully managed SageMaker Studio JupyterLab experience. The new SageMaker Studio JupyterLab experience combines the best of both worlds: the scalability and flexibility of SageMaker Studio Classic (see the appendix at the end of this post) with the stability and familiarity of the open source JupyterLab. To grasp the design of this new JupyterLab experience, let’s delve into the following architecture diagram. This will help us better understand the integration and features of this new JupyterLab Spaces platform.

In summary, we have transitioned towards a localized architecture. In this new setup, Jupyter server and kernel processes operate alongside in a single Docker container, hosted on the same ML compute instance. These ML instances are provisioned when a Space is running, and linked with an EBS volume that is created when the Space was initially created.
This new architecture brings several benefits; we discuss some of these in the following sections.
Reduced latency and increased stability
SageMaker Studio has transitioned to a local run model, moving away from the previous split model where code was stored on an EFS mount and run remotely on an ML instance via remote Kernel Gateway. In the earlier setup, Kernel Gateway, a headless web server, enabled kernel operations over remote communication with Jupyter kernels through HTTPS/WSS. User actions like running code, managing notebooks, or running terminal commands were processed by a Kernel Gateway app on a remote ML instance, with Kernel Gateway facilitating these operations over ZeroMQ (ZMQ) within a Docker container. The following diagram illustrates this architecture.

The updated JupyterLab architecture runs all kernel operations directly on the local instance. This local Jupyter Server approach typically provides improved performance and straightforward architecture. It minimizes latency and network complexity, simplifies the architecture for easier debugging and maintenance, enhances resource utilization, and accommodates more flexible messaging patterns for a variety of complex workloads.

In essence, this upgrade brings running notebooks and code much closer to the kernels, significantly reducing latency and boosting stability.
Improved control over provisioned storage
SageMaker Studio Classic originally used Amazon EFS to provide persistent, shared file storage for user home directories within the SageMaker Studio environment. This setup enables you to centrally store notebooks, scripts, and other project files, accessible across all your SageMaker Studio sessions and instances.
With the latest update to SageMaker Studio, there is a shift from Amazon EFS-based storage to an Amazon EBS-based solution. The EBS volumes, provisioned with SageMaker Studio Spaces, are GP3 volumes designed to deliver a consistent baseline performance of 3,000 IOPS, independent of the volume size. This new Amazon EBS storage offers higher performance for I/O-intensive tasks such as model training, data processing, high-performance computing, and data visualization. This transition also gives SageMaker Studio administrators greater insight into and control over storage usage by user profiles within a domain or across SageMaker. You can now set default (DefaultEbsVolumeSizeInGb) and maximum (MaximumEbsVolumeSizeInGb) storage sizes for JupyterLab Spaces within each user profile.
In addition to improved performance, you have the ability to flexibly resize the storage volume attached to your Space’s ML compute instance by editing your Space setting either using the UI or API action from your SageMaker Studio interface, without requiring any administration action. However, note that you can only edit EBS volume sizes in one direction—after you increase the Space’s EBS volume size, you will not be able to lower it back down.
SageMaker Studio now offers elevated control of provisioned storage for administrators:
- SageMaker Studio administrators can manage the EBS volume sizes for user profiles. These JupyterLab EBS volumes can vary from a minimum of 5 GB to a maximum of 16 TB. The following code snippet shows how to create or update a user profile with default and maximum space settings:
- SageMaker Studio now offers an enhanced auto-tagging feature for Amazon EBS resources, automatically labeling volumes created by users with domain, user, and Space information. This advancement simplifies cost allocation analysis for storage resources, aiding administrators in managing and attributing costs more effectively. It’s also important to note that these EBS volumes are hosted within the service account, so you won’t have direct visibility. Nonetheless, storage usage and associated costs are directly linked to the domain ARN, user profile ARN, and Space ARN, facilitating straightforward cost allocation.
- Administrators can also control encryption of a Space’s EBS volumes, at rest, using customer managed keys (CMK).
Shared tenancy with bring-your-own EFS file system
ML workflows are typically collaborative, requiring efficient sharing of data and code among team members. The new SageMaker Studio enhances this collaborative aspect by enabling you to share data, code, and other artifacts via a shared bring-your-own EFS file system. This EFS drive can be set up independently of SageMaker or could be an existing Amazon EFS resource. After it’s provisioned, it can be seamlessly mounted onto SageMaker Studio user profiles. This feature is not restricted to user profiles within a single domain—it can extend across domains, as long as they are within the same Region.
The following example code shows you how to create a domain and attach an existing EFS volume to it using its associated fs-id. EFS volumes can be attached to a domain at the root or prefix level, as the following commands demonstrate:
When an EFS mount is made available in a domain and its related user profiles, you can choose to attach it to a new space. This can be done using either the SageMaker Studio UI or an API action, as shown in the following example. It’s important to note that when a space is created with an EFS file system that’s provisioned at the domain level, the space inherits its properties. This means that if the file system is provisioned at a root or prefix level within the domain, these settings will automatically apply to the space created by the domain users.

After mounting it to a Space, you can locate all your files located above the admin-provisioned mount point. These files can be found in the directory path /mnt/custom-file-system/efs/fs-12345678.

EFS mounts make is straightforward to share artifacts between a user’s Space or between multiple users or across domains, making it ideal for collaborative workloads. With this feature, you can do the following:
- Share data – EFS mounts are ideal for storing large datasets crucial for data science experiments. Dataset owners can load these mounts with training, validation, and test datasets, making them accessible to user profiles within a domain or across multiple domains. SageMaker Studio admins can also integrate existing application EFS mounts while maintaining compliance with organizational security policies. This is done through flexible prefix-level mounting. For example, if production and test data are stored on the same EFS mount (such as
fs-12345678:/data/prod and fs-12345678:/data/test), mounting/data/testonto the SageMaker domain’s user profiles grants users access only to the test dataset. This setup allows for analysis or model training while keeping production data secure and inaccessible. - Share Code – EFS mounts facilitate the quick sharing of code artifacts between user profiles. In scenarios where users need to rapidly share code samples or collaborate on a common code base without the complexities of frequent git push/pull commands, shared EFS mounts are highly beneficial. They offer a convenient way to share work-in-progress code artifacts within a team or across different teams in SageMaker Studio.
- Share development environments – Shared EFS mounts can also serve as a means to quickly disseminate sandbox environments among users and teams. EFS mounts provide a solid alternative for sharing Python environments like conda or virtualenv across multiple workspaces. This approach circumvents the need for distributing
requirements.txtorenvironment.ymlfiles, which can often lead to the repetitive task of creating or recreating environments across different user profiles.
These features significantly enhance the collaborative capabilities within SageMaker Studio, making it effortless for teams to work together efficiently on complex ML projects. Additionally, Code Editor based on Code-OSS (Visual Studio Code Open Source) shares the same architectural principles as the aforementioned JupyterLab experience This alignment brings several advantages, such as reduced latency, enhanced stability, and improved administrative control, and enables user access to shared workspaces, similar to those offered in JupyterLab Spaces.
Generative AI-powered tools on JupyterLab Spaces
Generative AI, a rapidly evolving field in artificial intelligence, uses algorithms to create new content like text, images, and code from extensive existing data. This technology has revolutionized coding by automating routine tasks, generating complex code structures, and offering intelligent suggestions, thereby streamlining development and fostering creativity and problem-solving in programming. As an indispensable tool for developers, generative AI enhances productivity and drives innovation in the tech industry. SageMaker Studio enhances this developer experience with pre-installed tools like Amazon CodeWhisperer and Jupyter AI, using generative AI to accelerate the development lifecycle.
Amazon CodeWhisperer
Amazon CodeWhisperer is a programming assistant that enhances developer productivity through real-time code recommendations and solutions. As an AWS managed AI service, it’s seamlessly integrated into the SageMaker Studio JupyterLab IDE. This integration makes Amazon CodeWhisperer a fluid and valuable addition to a developer’s workflow.
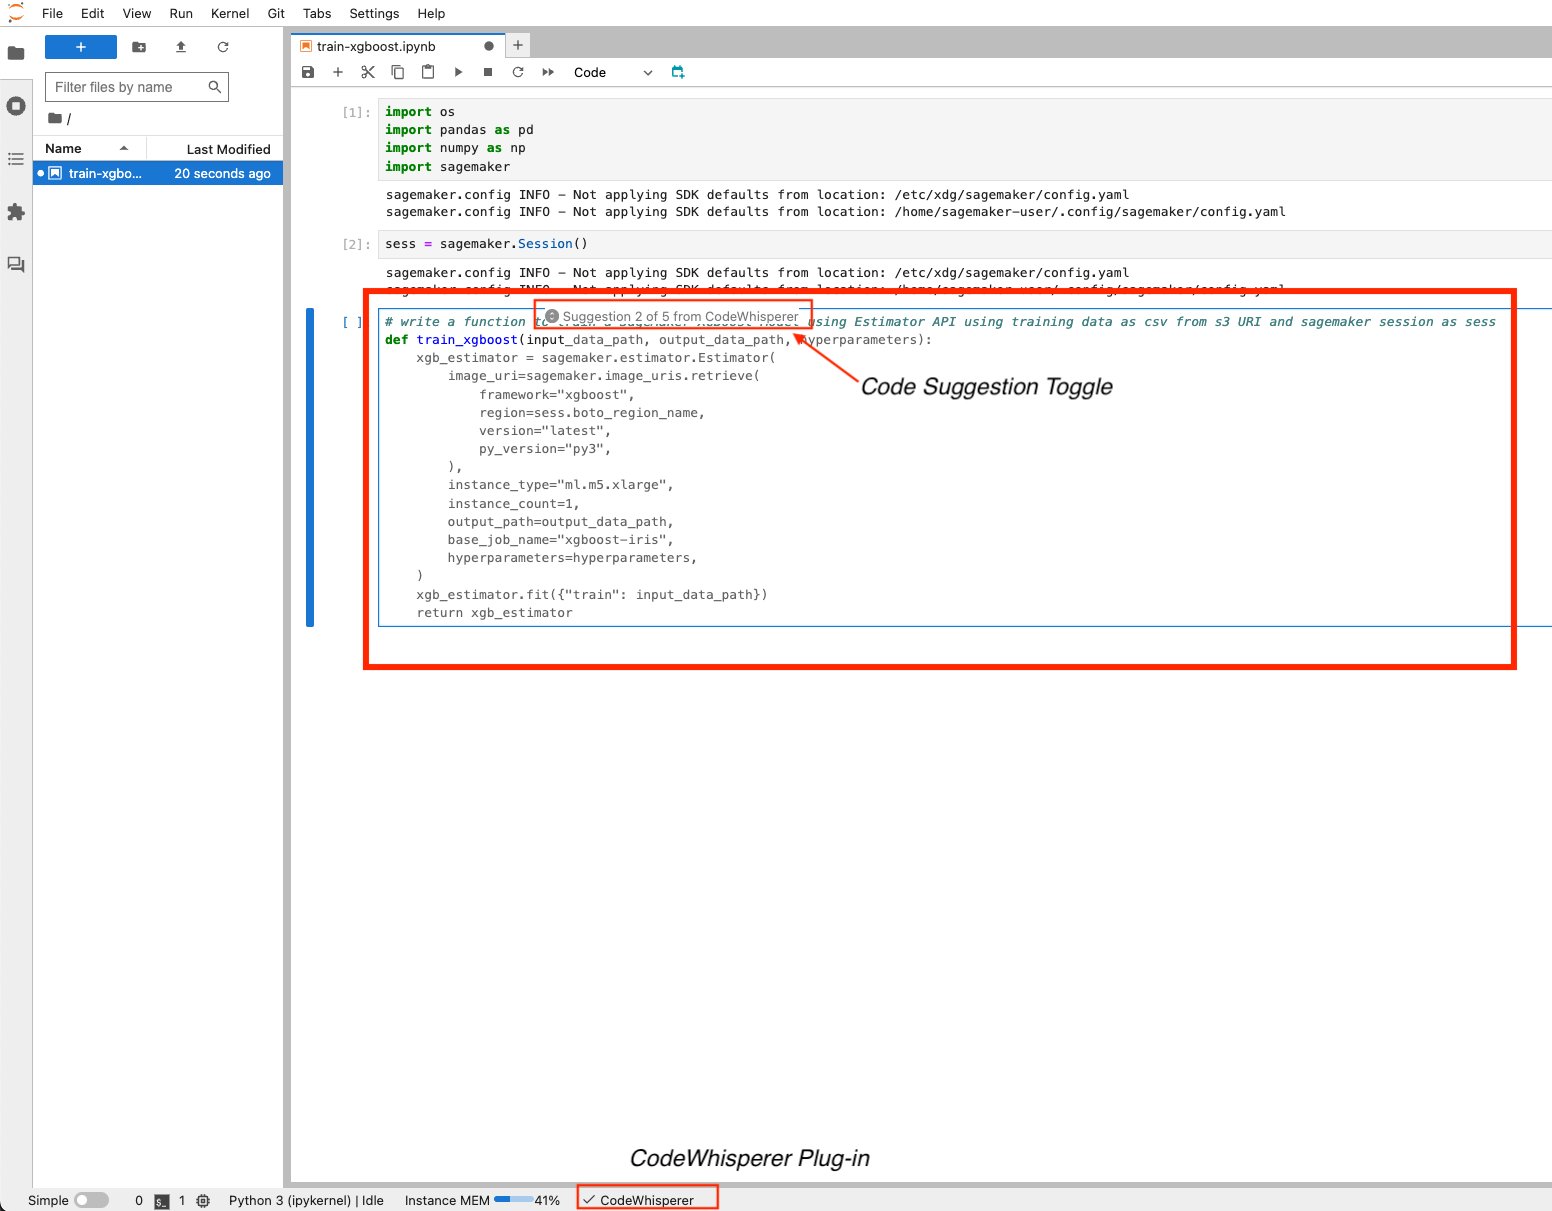
Amazon CodeWhisperer excels in increasing developer efficiency by automating common coding tasks, suggesting more effective coding patterns, and decreasing debugging time. It serves as an essential tool for both beginner and seasoned coders, providing insights into best practices, accelerating the development process, and improving the overall quality of code. To start using Amazon CodeWhisperer, make sure that the Resume Auto-Suggestions feature is activated. You can manually invoke code suggestions using keyboard shortcuts.

Alternatively, write a comment describing your intended code function and begin coding; Amazon CodeWhisperer will start providing suggestions.
Note that although Amazon CodeWhisperer is pre-installed, you must have the codewhisperer:GenerateRecommendations permission as part of the execution role to receive code recommendations. For additional details, refer to Using CodeWhisperer with Amazon SageMaker Studio. When you use Amazon CodeWhisperer, AWS may, for service improvement purposes, store data about your usage and content. To opt out of the Amazon CodeWhisperer data sharing policy, you can navigate to the Setting option from the top menu then navigate to Settings Editor and disable Share usage data with Amazon CodeWhisperer from the Amazon CodeWhisperer settings menu.
Jupyter AI
Jupyter AI is an open source tool that brings generative AI to Jupyter notebooks, offering a robust and user-friendly platform for exploring generative AI models. It enhances productivity in JupyterLab and Jupyter Notebooks by providing features like the %%ai magic for creating a generative AI playground inside notebooks, a native chat UI in JupyterLab for interacting with AI as a conversational assistant, and support for a wide array of large language model (LLM) providers like AI21, Anthropic, Cohere, and Hugging Face or managed services like Amazon Bedrock and SageMaker endpoints. This integration offers more efficient and innovative methods for data analysis, ML, and coding tasks. For example, you can interact with a domain-aware LLM using the Jupyternaut chat interface for help with processes and workflows or generate example code through CodeLlama, hosted on SageMaker endpoints. This makes it a valuable tool for developers and data scientists.

Jupyter AI provides an extensive selection of language models ready for use right out of the box. Additionally, custom models are also supported via SageMaker endpoints, offering flexibility and a broad range of options for users. It also offers support for embedding models, enabling you to perform inline comparisons and tests and even build or test ad hoc Retrieval Augmented Generation (RAG) apps.

Jupyter AI can act as your chat assistant, helping you with code samples, providing you with answers to questions, and much more.

You can use Jupyter AI’s %%ai magic to generate sample code inside your notebook, as shown in the following screenshot.

JupyterLab 4.0
The JupyterLab team has released version 4.0, featuring significant improvements in performance, functionality, and user experience. Detailed information about this release is available in the official JupyterLab Documentation.
This version, now standard in SageMaker Studio JupyterLab, introduces optimized performance for handling large notebooks and faster operations, thanks to improvements like CSS rule optimization and the adoption of CodeMirror 6 and MathJax 3. Key enhancements include an upgraded text editor with better accessibility and customization, a new extension manager for easy installation of Python extensions, and improved document search capabilities with advanced features. Additionally, version 4.0 brings UI improvements, accessibility enhancements, and updates to development tools, and certain features have been backported to JupyterLab 3.6.
Conclusion
The advancements in SageMaker Studio, particularly with the new JupyterLab experience, mark a significant leap forward in ML development. The updated SageMaker Studio UI, with its integration of JupyterLab, Code Editor, and RStudio, offers an unparalleled, streamlined environment for ML developers. The introduction of JupyterLab Spaces provides flexibility and ease in customizing compute and storage resources, enhancing the overall efficiency of ML workflows. The shift from a remote kernel architecture to a localized model in JupyterLab greatly increases stability while decreasing startup latency. This results in a quicker, more stable, and responsive coding experience. Moreover, the integration of generative AI tools like Amazon CodeWhisperer and Jupyter AI in JupyterLab further empowers developers, enabling you to use AI for coding assistance and innovative problem-solving. The enhanced control over provisioned storage and the ability to share code and data effortlessly through self-managed EFS mounts greatly facilitate collaborative projects. Lastly, the release of JupyterLab 4.0 within SageMaker Studio underscores these improvements, offering optimized performance, better accessibility, and a more user-friendly interface, thereby solidifying JupyterLab’s role as a cornerstone of efficient and effective ML development in the modern tech landscape.
Give SageMaker Studio JupyterLab Spaces a try using our quick onboard feature, which allows you to spin up a new domain for single users within minutes. Share your thoughts in the comments section!
Appendix: SageMaker Studio Classic’s kernel gateway architecture
A SageMaker Classic domain is a logical aggregation of an EFS volume, a list of users authorized to access the domain, and configurations related to security, application, networking, and more. In the SageMaker Studio Classic architecture of SageMaker, each user within the SageMaker domain has a distinct user profile. This profile encompasses specific details like the user’s role and their Posix user ID in the EFS volume, among other unique data. Users access their individual user profile through a dedicated Jupyter Server app, connected via HTTPS/WSS in their web browser. SageMaker Studio Classic uses a remote kernel architecture using a combination of Jupyter Server and Kernel Gateway app types, enabling notebook servers to interact with kernels on remote hosts. This means that the Jupyter kernels operate not on the notebook server’s host, but within Docker containers on separate hosts. In essence, your notebook is stored in the EFS home directory, and runs code remotely on a different Amazon Elastic Compute Cloud (Amazon EC2) instance, which houses a pre-built Docker container equipped with ML libraries such as PyTorch, TensorFlow, Scikit-Learn, and more.
The remote kernel architecture in SageMaker Studio offers notable benefits in terms of scalability and flexibility. However, it has its limitations, including a maximum of four apps per instance type and potential bottlenecks due to numerous HTTPS/WSS connections to a common EC2 instance type. These limitations could negatively affect the user experience.
The following architecture diagram depicts the SageMaker Studio Classic architecture. It illustrates the user’s process of connecting to a Kernel Gateway app via a Jupyter Server app, using their preferred web browser.

About the authors
 Pranav Murthy is an AI/ML Specialist Solutions Architect at AWS. He focuses on helping customers build, train, deploy and migrate machine learning (ML) workloads to SageMaker. He previously worked in the semiconductor industry developing large computer vision (CV) and natural language processing (NLP) models to improve semiconductor processes using state of the art ML techniques. In his free time, he enjoys playing chess and traveling. You can find Pranav on LinkedIn.
 Kunal Jha is a Senior Product Manager at AWS. He is focused on building Amazon SageMaker Studio as the best-in-class choice for end-to-end ML development. In his spare time, Kunal enjoys skiing and exploring the Pacific Northwest. You can find him on LinkedIn.
 Majisha Namath Parambath is a Senior Software Engineer at Amazon SageMaker. She has been at Amazon for over 8 years and is currently working on improving the Amazon SageMaker Studio end-to-end experience.
 Bharat Nandamuri is a Senior Software Engineer working on Amazon SageMaker Studio. He is passionate about building high scale backend services with focus on Engineering for ML systems. Outside of work, he enjoys playing chess, hiking and watching movies.
 Derek Lause is a Software Engineer at AWS. He is committed to deliver value to customers through Amazon SageMaker Studio and Notebook Instances. In his spare time, Derek enjoys spending time with family and friends and hiking. You can find Derek on LinkedIn.
- SEO Powered Content & PR Distribution. Get Amplified Today.
- PlatoData.Network Vertical Generative Ai. Empower Yourself. Access Here.
- PlatoAiStream. Web3 Intelligence. Knowledge Amplified. Access Here.
- PlatoESG. Carbon, CleanTech, Energy, Environment, Solar, Waste Management. Access Here.
- PlatoHealth. Biotech and Clinical Trials Intelligence. Access Here.
- Source: https://aws.amazon.com/blogs/machine-learning/boost-productivity-on-amazon-sagemaker-studio-introducing-jupyterlab-spaces-and-generative-ai-tools/

