A recommendation engine is only as good as the data used to prepare it. Transforming raw data into a format that is suitable for a model is key to getting better personalized recommendations for end-users.
In this post, we walk through how to prepare and import the MovieLens dataset, a dataset prepared by GroupLens research at the University of Minnesota, which consists of a variety of user rankings of various movies, into Amazon Personalize using Amazon SageMaker Data Wrangler. [1]
Solution overview
Amazon Personalize is a managed service whose core value proposition is its ability to learn user preferences from their past behavior and quickly adjust those learned preferences to take account of changing user behavior in near-real time. To be able to develop this understanding of users, Amazon Personalize needs to train on the historical user behavior so that it can find patterns that are generalizable towards the future. Specifically, the main type of data that Amazon Personalize learns from is what we call an interactions dataset, which is a tabular dataset that consists of at minimum three critical columns, userID, itemID, and timestamp, representing a positive interaction between a user and an item at a specific time. Users Amazon Personalize need to upload data containing their own customer’s interactions in order for the model to be able to learn these behavioral trends. Although the internal algorithms within Amazon Personalize have been chosen based on Amazon’s experience in the machine learning space, a personalized model doesn’t come pre-loaded with any sort of data and trains models on a customer-by-customer basis.
The MovieLens dataset explored in this walkthrough isn’t in this format, so to prepare it for Amazon Personalize, we use SageMaker Data Wrangler, a purpose-built data aggregation and preparation tool for machine learning. It has over 300 preconfigured data transformations as well as the ability to bring in custom code to create custom transformations in PySpark, SQL, and a variety of data processing libraries, such as pandas.
Prerequisites
First, we need to have an Amazon SageMaker Studio domain set up. For details on how to set it up, refer to Onboard to Amazon SageMaker Domain using Quick setup.
Also, we need to set up the right permissions using AWS Identity and Access Management (IAM) for Amazon Personalize and Amazon SageMaker service roles so that they can access the needed functionalities.
You can create a new Amazon Personalize dataset group to use in this walkthrough or use an existing one.
Finally, we need to download and unzip the MovieLens dataset and place it in an Amazon Simple Storage Service (Amazon S3) bucket.
Launch SageMaker Data Wrangler from Amazon Personalize
To start with the SageMaker Data Wrangler integration with Amazon Personalize, complete the following steps:
- On the Amazon Personalize console, navigate to the Overview page of your dataset group.
- Choose Import interaction data, Import user data, or Import item data, depending on the dataset type (for this post, we choose Import interaction data).

- For Import method, select Import data using Data Wrangler.
- Choose Next.

- Specify the SageMaker domain, user profile, and IAM service role that you created earlier as part of the prerequisites.
- Choose Next.

- Continue through the steps to launch an instance of SageMaker Data Wrangler.
Setting up the environment for the first time can take up to 5 minutes.
Import the raw data into SageMaker Data Wrangler
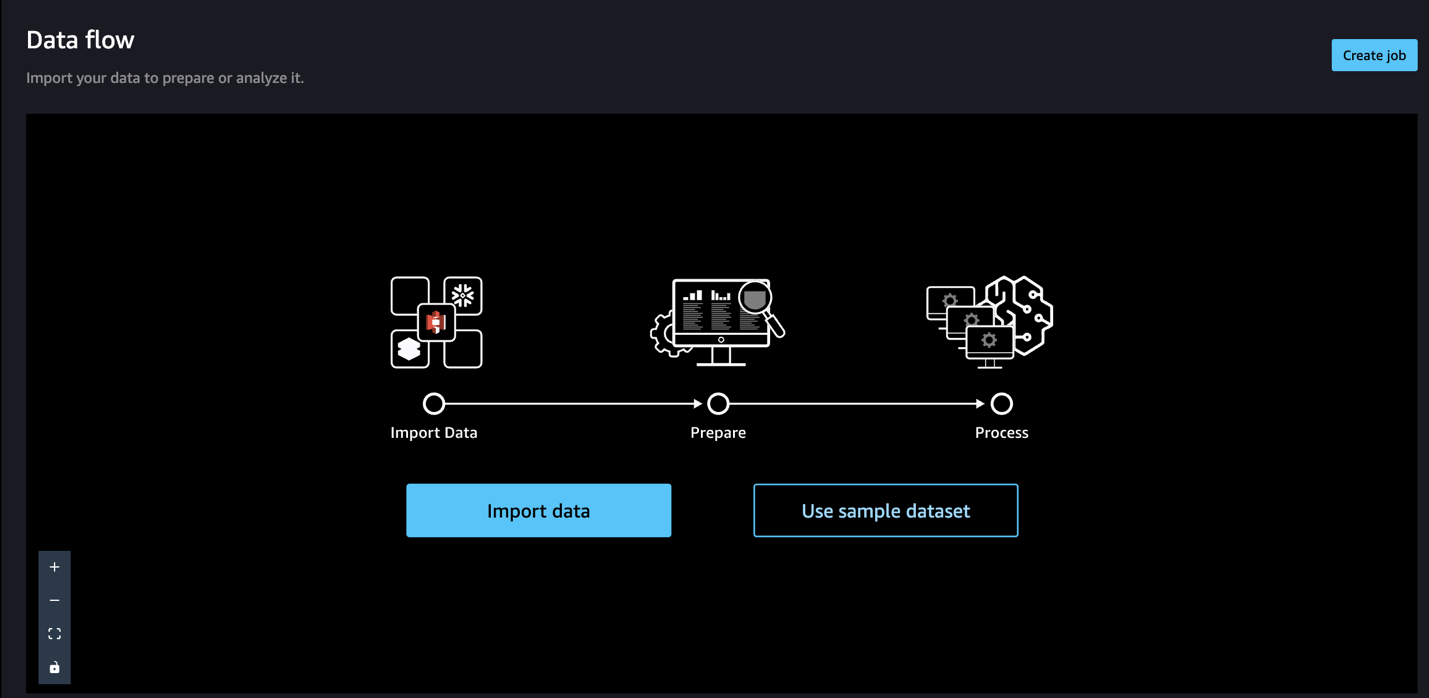
When using SageMaker Data Wrangler to prepare and import data, we use a data flow. A data flow defines a series of transformations and analyses on data to prepare it to create a machine learning model. Each time we add a step to our flow, SageMaker Data Wrangler takes an action on our data, such as joining it with another dataset or dropping some rows and columns.
To start, let’s import the raw data.
- On the data flow page, choose Import data.
With SageMaker Data Wrangler, we can import data from over 50 supported data sources.
- For Data sources¸ choose Amazon S3.

- Choose the dataset you uploaded to your S3 bucket.
SageMaker Data Wrangler automatically displays a preview of the data.
- Keep the default settings and choose Import.

After the data is imported, SageMaker Data Wrangler automatically validates the datasets and detects the data types for all the columns based on its sampling.
- Choose Data flow at the top of the Data types page to view the main data flow before moving to the next step.

One of the main advantages of SageMaker Data Wrangler is the ability to run previews of your transformations on a small subset of data before committing to apply the transformations on the entire dataset. To run the same transformation on multiple partitioned files in Amazon S3, you can use parameters.
Transform the data
To transform data in SageMaker Data Wrangler, you add a Transform step to your data flow. SageMaker Data Wrangler includes over 300 transforms that you can use to prepare your data, including a Map columns for Amazon Personalize transform. You can use the general SageMaker Data Wrangler transforms to fix issues such as outliers, type issues, and missing values, or apply data preprocessing steps.
To use Amazon Personalize, the data you provided in the interactions dataset must match your dataset schema. For our movie recommender engine, the proposed interactions dataset schema includes:
user_id(string)item_id(string)event_type(string)timestamp(in Unix epoch time format)
To learn more about Amazon Personalize datasets and schemas, refer to Datasets and schemas.
The ratings.csv file as shown in the last step in the previous section includes movies rated from 1–5. We want to build a movie recommender engine based on that. To do so, we must complete the following steps:
- Modify the columns data types.
- Create two event types: Click and Watch.
- Assign all movies rated 2 and above as Click and movies rated 4 and above as both Click and Watch.
- Drop the
ratingscolumn. - Map the columns to the Amazon Personalize interactions dataset schema.
- Validate that our timestamp is in Unix epoch time.
Note that Step 3 isn’t needed to make a personalization model. If we want to use one of the Amazon Personalize streamlined video on demand domain recommenders, such as Top Picks for You, Click and Watch would be required event types. However, if we don’t have these, we could not include an event type field (or add our own event types such as the raw user ratings) and use a custom recipe such as User Personalization. Regardless of what type of recommendation engine we use, we need to ensure our dataset contains only representations of positive user intent. So whatever approach you choose, you need to drop all one-star ratings (and possibly two-star ratings as well).
Now let’s use SageMaker Data Wrangler to perform the preceding steps.
- On the Data flow page, choose the first transform, called Data types.

- Update the type for each column.
- Choose Preview to reflect the changes, then choose Update.

- To add a step in the data flow, choose the plus sign next to the step you want to perform the transform on, then choose Add transform.

- To filter the event Click out of the movie ratings, we add a Filter data step to filter out the movies rated 2 and above.

- Add another custom transform step to add a new column,
eventType, with Click as an assigned value. - Choose Preview to review your transformation to double-check the results are as intended, then choose Add.
- In this case, we write some PySpark code to add a column called
eventTypewhose value will be uniformly Click for all of our two-star through five-star movies:

- For the Watch events, repeat the previous steps for movies rated 4 and above and assign the Watch value by adding the steps to the Data types step. Our PySpark code for these steps is as follows:
Up to this point, the data flow should look like the following screenshot.

Concatenate datasets
Because we have two datasets for watched and clicked events, let’s walk through how to concatenate these into one interactions dataset.
- On the Data flow page, choose the plus sign next to Create Watch Event and choose Concatenate.
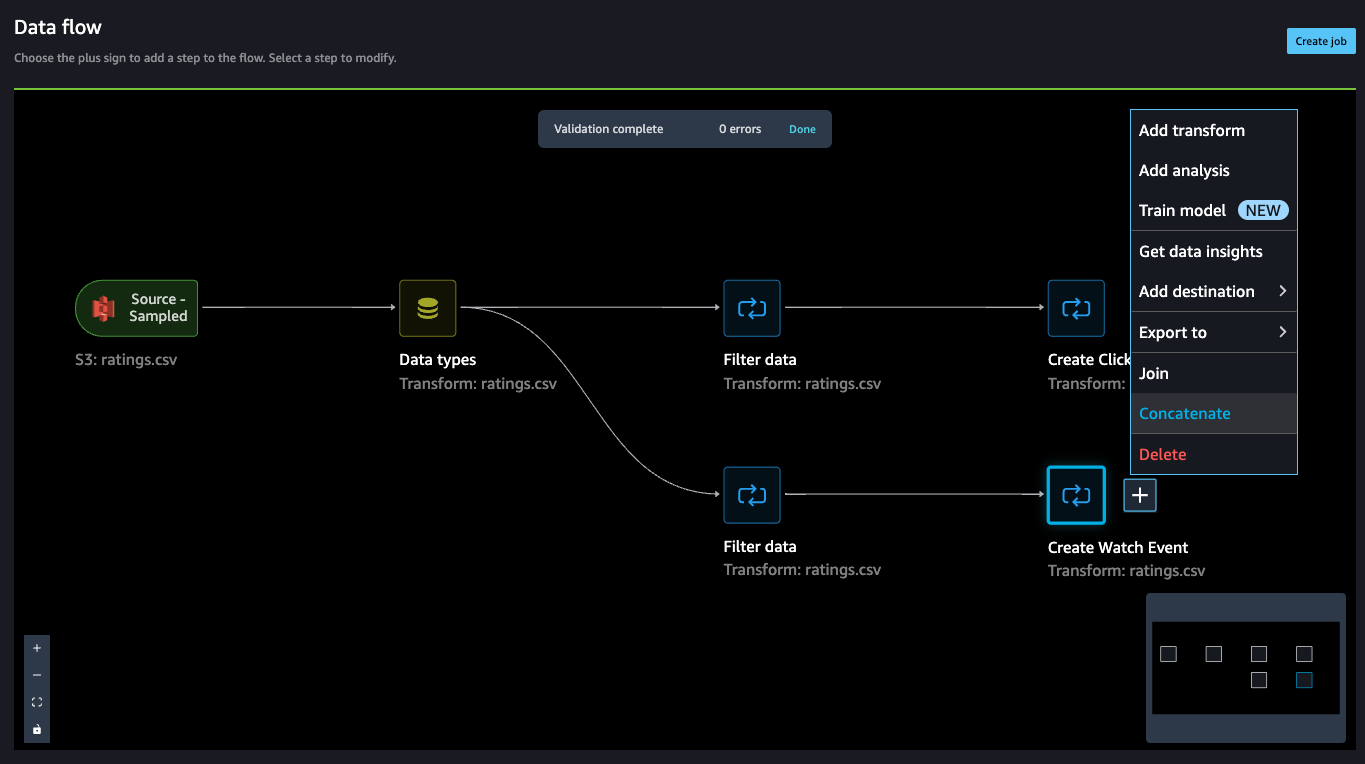
- Choose the other final step (Create Click Event), and this should automatically map (converge) both the sets into a concatenate preview.
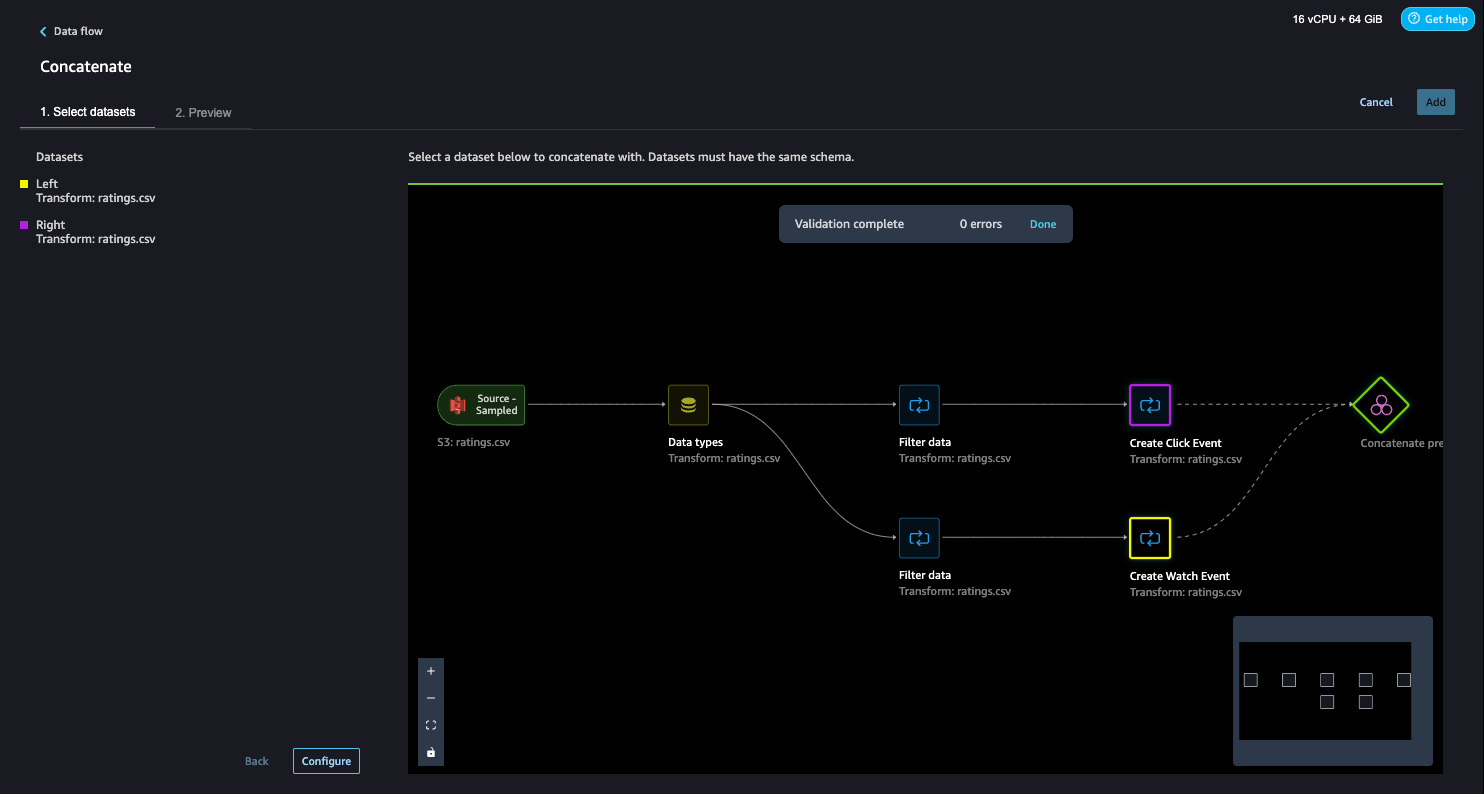
- Choose Configure to view a preview of the concatenated datasets.
- Add a name to the step.
- Choose Add to add the step.

The data flow now looks like the following screenshot.

- Now, let’s add a Manage columns step to drop the original rating column.

Amazon Personalize has default column names for users, items, and timestamps. These default column names are user_id, item_id, and timestamp.
- Let’s add a Transform for Amazon Personalize step to replace the existing column headers with the default headers.
- In our case, we also use the
event_typefield, so let’s map that as well.

With this step, the data transformation activity is complete and the interactions dataset is ready for the next step.

Next, let’s validate our timestamps.
- We can do this by adding a Custom transform step. For this post, we choose Python (User-Defined Function).
- Choose timestamp as the input column and as the output, create a new column called
readable_timestamp. - Choose Python as the mode for the transformation and insert the following code for the Python function:
- Choose Preview to review the changes.

In this case, we see dates in the 2000s—because MovieLens started collecting data in 1996, this aligns with what is expected. If we don’t choose Add, this transformation won’t be added to our data flow.
- Because this was merely a sanity check, you can navigate back to the data flow by choosing Data flow in the upper left corner.

Finally, we add an analysis step to create a summary report about the dataset. This step performs an analysis to assess the suitability of the dataset for Amazon Personalize.
- Choose the plus sign next to the final step on the data flow and choose Add analysis.
- For Analysis type¸ choose Data Quality And Insights Report for Amazon Personalize.
- For Dataset type¸ choose Interactions.
- Choose Create.
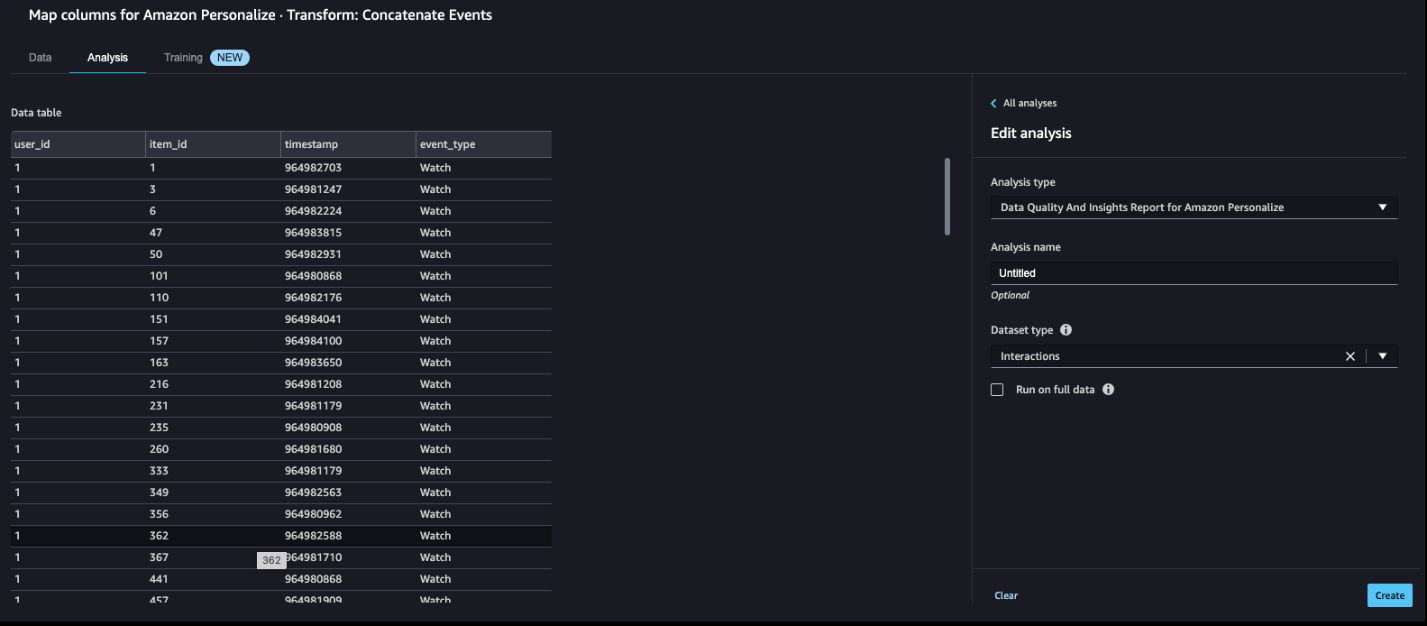
The MovieLens dataset is quite clean, so the analysis shows no issues. If some issues were identified, you can iterate on the dataset and rerun the analysis until you can address them.

Note the analysis by default runs on a sample of 50,000 rows.
Import the dataset to Amazon Personalize
At this point, our raw data has been transformed and we are ready to import the transformed interactions dataset to Amazon Personalize. SageMaker Data Wrangler gives you the ability to export your data to a location within an S3 bucket. You can specify the location using one of the following methods:
- Destination node – Where SageMaker Data Wrangler stores the data after it has processed it
- Export to – Exports the data resulting from a transformation to Amazon S3
- Export data – For small datasets, you can quickly export the data that you’ve transformed
With the Destination node method, to export your data, you create destination nodes and a SageMaker Data Wrangler job. Creating a SageMaker Data Wrangler job starts a SageMaker Processing job to export your flow. You can choose the destination nodes that you want to export after you’ve created them.
- Choose the plus sign next to the node that represents the transformations you want to export.

- Choose Export to and then choose Amazon S3 (via Jupyter Notebook).
Note we could have also chosen to export the data to Amazon Personalize via a Jupyter notebook available in SageMaker Data Wrangler.

- For Dataset name, enter a name, which will be used as a folder name in the S3 bucket provided as a destination.
- You can specify the file type, field delimiter, and compression method.
- Optionally, specify the number of partitions and column to partition by.
- Choose Add destination.

The data flow should look like the following screenshot.

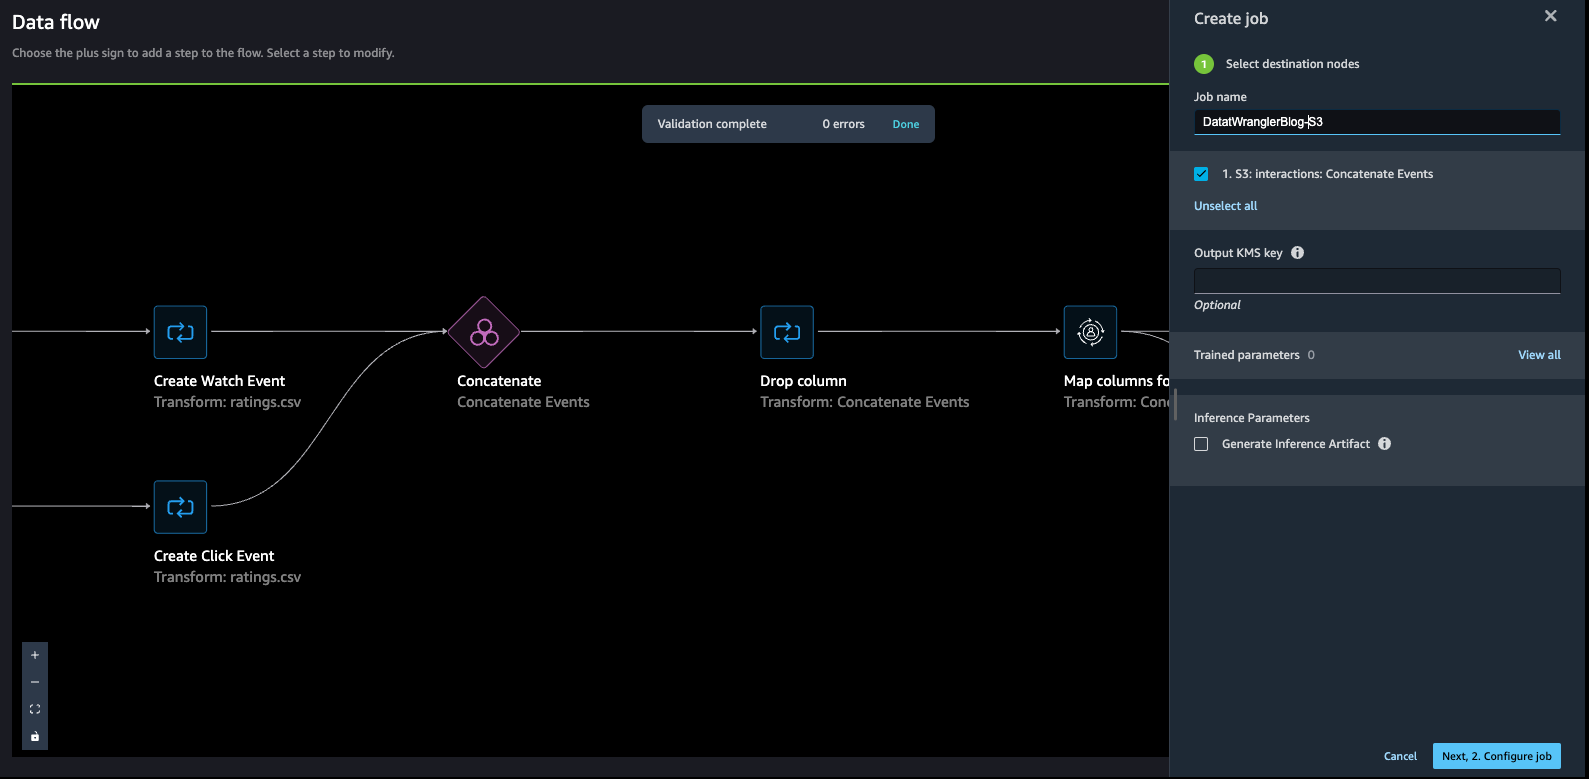
- Create a job to process the data flow and store the data in the destination (S3 bucket) that we configured in the previous step.
- Enter a job name, then choose Configure job.
SageMaker Data Wrangler provides the ability to configure the instance type, instance count, and job configuration, and the ability to create a schedule to process the job. For guidance on how to choose an instance count, refer to Create and Use a Data Wrangler Flow.
To monitor the status of the job, navigate to the Dashboard page on the SageMaker console. The Processing section shows the number of completed and created jobs. You can drill down to get more details about the completed job.

When the job is complete, a new file of the transformed data is created in the destination specified.

- Return to the Amazon Personalize console and navigate to the dataset group to import another dataset.
- Choose Import interaction data.

- Select Import data directly into Amazon Personalize datasets to import the transformed dataset directly from Amazon S3, then choose Next.

- Define the schema. For this post, our case our dataset consists of the
user_id(string),item_id(string),event_type(string), andtimestamp(long) fields.

At this point, you can create a video on demand domain recommender or a custom solution. To do so, follow the steps in Preparing and importing data
Conclusion
In this post, we described how to use SageMaker Data Wrangler to prepare a sample dataset for Amazon Personalize. SageMaker Data Wrangler offers over 300 transformations. These transformations and the ability to add custom user transformations can help streamline the process of creating a quality dataset to offer hyper-personalized content to end-users.
Although we only explored how to prepare an interactions dataset in this post, you can use SageMaker Data Wrangler to prepare user and item datasets as well. For more information on the types of data that can be used with Amazon Personalize, refer to Datasets and schemas.
If you’re new to Amazon Personalize or SageMaker Data Wrangler, refer to Get Started with Amazon Personalize or Get Started with SageMaker Data Wrangler, respectively. If you have any questions related to this post, please add them in the comments section.
About the Authors
 Maysara Hamdan is a Partner Solutions Architect based in Atlanta, Georgia. Maysara has over 15 years of experience in building and architecting Software Applications and IoT Connected Products in Telecom and Automotive Industries. In AWS, Maysara helps partners in building their cloud practices and growing their businesses. Maysara is passionate about new technologies and is always looking for ways to help partners innovate and grow.
 Eric Bolme is a Specialist Solution Architect with AWS based on the East Coast of the United States. He has 8 years of experience building out a variety of deep learning and other AI use cases and focuses on Personalization and Recommendation use cases with AWS.
References
[1] Maxwell Harper and Joseph A. Konstan. 2015. The MovieLens Datasets: History and Context. ACM Transactions on Interactive Intelligent Systems (TiiS) 5, 4, Article 19 (December 2015), 19 pages. DOI=https://dx.doi.org/10.1145/2827872
- SEO Powered Content & PR Distribution. Get Amplified Today.
- PlatoData.Network Vertical Generative Ai. Empower Yourself. Access Here.
- PlatoAiStream. Web3 Intelligence. Knowledge Amplified. Access Here.
- PlatoESG. Carbon, CleanTech, Energy, Environment, Solar, Waste Management. Access Here.
- PlatoHealth. Biotech and Clinical Trials Intelligence. Access Here.
- Source: https://aws.amazon.com/blogs/machine-learning/prepare-your-data-for-amazon-personalize-with-amazon-sagemaker-data-wrangler/

