Amazon Kendra is an intelligent search service powered by machine learning (ML). With Amazon Kendra, you can easily aggregate content from a variety of content repositories into an index that lets you quickly search all your enterprise data and find the most accurate answer. Adobe Experience Manager (AEM) is a content management system that’s used for creating website or mobile app content. Many organizations use Adobe Experience Manager (On-Premise) or Adobe Experience Manager (Cloud Service) as their content management platform. Enterprise users need to be able to search for accurate answers easily and securely across content from multiple data sources in the enterprise, including AEM, from content such as assets and pages.
Amazon Kendra customers can now use the Amazon Kendra AEM connector to index pages and assets from AEM. Amazon Kendra supports AEM as a Cloud Service author instances and AEM On-Premise author and publish instances. You can index AEM content and filter the types of content you want to index with the Amazon Kendra AEM On-Premise or Cloud Service connector, and search your data from AEM with Amazon Kendra intelligent search.
This post shows you how to configure the Amazon Kendra AEM connector to index your content and search your AEM assets and pages. The connector also ingests the access control list (ACL) information for each document. The ACL information is used to show search results filtered by what a user has access to.
Solution overview
In our solution, we configure AEM as a data source for an Amazon Kendra search index using the Amazon Kendra AEM connector. Based on the configuration, when the data source is synchronized, the connector crawls and indexes all the content from AEM that was created on or before a specific date. The connector also indexes the Access Control List (ACL) information for each message and document. When access control or user context filtering is enabled, the search results of a query made by a user includes results only from those documents that the user is authorized to read.
The Amazon Kendra AEM connector can integrate with AWS IAM Identity Center (Successor to AWS Single Sign-On). You first must enable IAM Identity Center and create an organization to sync users and groups from your active directory. The connector will use the user name and group lookup for the user context of the search queries.
Prerequisites
To try out the Amazon Kendra connector for AEM using this post as a reference, you need the following:
Set up OAuth2.0
If you are using AEM On-Premise, setup OAuth2.0 to generate an SSL certificate in order to complete the configuration of Amazon Kendra AEM connector.
The Adobe Granite OAuth 2.0 server implementation (com.adobe.granite.oauth.server) provides the support for OAuth 2.0 server functionalities in AEM.
Enable the OAuth Server authentication handler
By default, AEM won’t enable the OAuth Server authentication handler. To enable it, complete the following steps:
- To start the AEM local instance, go to
https://localhost:<port>/system/console/configMgr/com.adobe.granite.oauth.server.auth.impl.OAuth2ServerAuthenticationHandler - Change the
jaas.ranking.namevalue to 1100 in the Adobe Granite OAuth Server Authentication Handler section and save the configuration.

The OAuth Server authentication handler is now enabled.

Register the OAuth client
Every external application requires OAuth authentication to be registered as an OAuth client in AEM. To register the OAuth client, complete the following steps:
- On the AEM start page, choose Security and OAuth client.
- Enter a name and redirect URI.
- Choose Save.

After a successful authorization of an application, the OAuth server will redirect you back to the application with an authorization code to the configured redirect URL.
- Copy the client ID and client secret and keep them safe.

The Granite OAuth Server supports the following grant types:
- Authorization code
- Refresh token
- JWT bearer token
For this post, we use OAuth2.0 with the JWT grant type.
The JWT bearer token is mainly used for server-to-server integration. This will help us enable the server-to-server integration without the resource owner interaction; for example, to retrieve or upload files without user interaction.

Generate the JWT token
Complete the following steps to generate the JWT token:
- Navigate to localhost and the OAuth client.
- Choose Download Private Key.
- Choose Download.

Generate the public certificate
Now, generate the public certificate from the downloaded private key, run the following command, and enter the private key password.
Use the openssl command to generate the private key:
Extract the private key:
Make sure to install openssl and add to the environment path beforehand.
Before using the private key while configuring the Amazon Kendra data source, make sure to not use or copy “-----BEGIN PRIVATE KEY-----” and “-----END PRIVATE KEY-----“ in the code. Additionally, remove any empty spaces from the private key.
Use the generated ClientId, ClientSecret, and private key to configure the Amazon Kendra AEM data source.
For OAuth client registration, navigate to https://localhost:<port>/libs/granite/oauth/content/clients.html.
Set up SSL
Complete the following steps to set up SSL:
- Create the key:
- Encrypt the key:
- Sign the key:
- Encode the private key to der format:
Four files will be generated with file names starting with <keyFileName>. We use <keyFileName>.crt and <keyFileName>.der in later steps.
- Next, log in to AEM at
https://localhost:<port>/aem/start.html. - Choose Tools, Security, and SSL Configuration.
- In the Store Credentials section, enter the key store and trust store password.

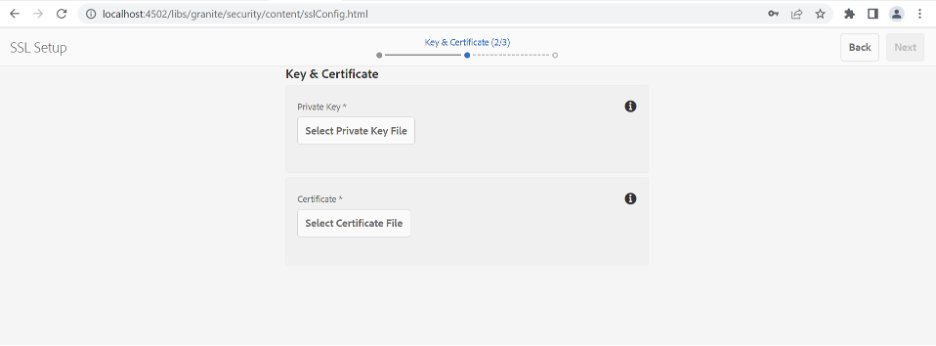
- In the Keys and Certificate section, specify the
.derfile for Private Key and the.crtfile for Certificate.
- In the next section, enter the domain (
localhost), and leave the port as is. - Choose Done.

AEM will open in the specified new port. For example, https://localhost:8443.
- Log in to AEM using HTTPS and download the certificate in the browser using the lock/pad button, export the certificate, and name it
privateKey.crt.
Now, let’s import the certificate into the keystore path using the key tool.
- Open a terminal and go to the folder location where
privateKey.crtis present and run the following command:
Be sure to open 8443 and 80 port in your firewall settings.
- Add the certificate
privateKey.crtto an Amazon Simple Storage Service (Amazon S3) bucket.
Configure the data source using the Amazon Kendra connector for AEM
You can use an existing index or create a new index to index documents from AEM using the AEM connector. Then complete the following steps. For more information, refer to the Amazon Kendra Developer Guide.
- On the Amazon Kendra console, open your index and choose Data sources in the navigation pane.
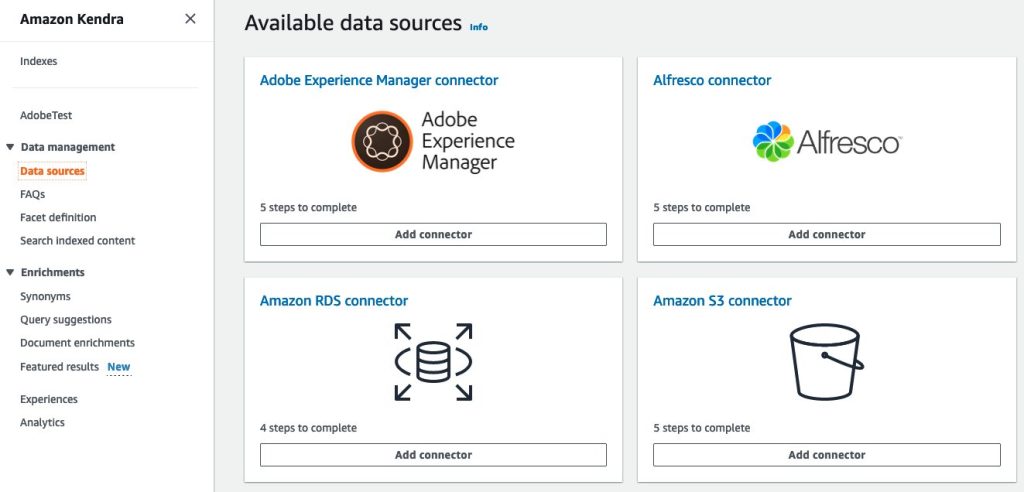
- Choose Add data source.
- Under Adobe Experience Manager, choose Add connector.
- In the Specify data source details section, enter a name and optionally a description, then choose Next.

- In the Define access and security section, select either the AEM On-Premise or AEM as a Cloud Service source type and enter the AEM host URL. You can find the URL in your AEM settings.
If using AEM On-Premise, enter the host URL of the AEM On-Premise server. Then choose Browse S3 and choose the S3 bucket with the SSL certificate.

If using AEM as a Cloud Service, you can use the author URL https://author-xxxxxx-xxxxxxx.adobeaemcloud.com.

- Under Authentication, you have two options, Basic authentication and OAuth 2.0 authentication.

If you select Basic authentication, for AWS Secrets Manager secret, choose Create and add a new secret. Then enter a name for the secret, the AEM site user name, and password. The user must have admin permission or be an admin user.

If you select OAuth 2.0 authentication, for AWS Secrets Manager secret, choose Create and add a new secret. Enter a name for the secret, client ID, client secret, and private key. If you use AEM as a Cloud Service, enter a name for the secret, client ID, client secret, private key, organization ID, technical account ID, and Adobe Identity Management System (IMS) host.

- Choose Save or Add Secret.
- In the Configure VPC and security group section, you can optionally choose to use a VPC. If so, you must add subnets and VPC security groups.
- In the Identity crawler section, choose to crawl identity information on users and groups with access to certain documents and store this in the Amazon Kendra principal or identity store.
This is useful for filtering search results based on the user or their group access to documents.
- In the IAM section, create a new IAM role or choose an existing IAM role to access repository credentials and index content.
- Choose Next.

- In the Configure sync settings section, provide information about your sync scope.
You can include the files to be crawled using inclusion patterns or exclude them using exclusion patterns. When you provide a pattern in the Include patterns section, only documents matching that pattern will be crawled. When you provide a pattern in the Exclude patterns section, documents matching that pattern will be not be crawled.
- If you use AEM On-Premise and the time zone of your server is different than the time zone of the Amazon Kendra AEM connector or index, you can specify the server time zone to align with the AEM connector or index in the Timezone ID section.
The default time zone for AEM On-Premise is the time zone of the Amazon Kendra AEM connector or index. The default time zone for AEM as a Cloud Service is Greenwich Mean Time.
- Choose the Sync mode (for this post, select Full sync).
With the Full sync option, every time the sync runs, Amazon Kendra will crawl all documents and ingest each document even if ingested earlier. The full refresh enables you to reset your Amazon Kendra index without the need to delete and create a new data source. If you choose New or modified content sync or New, modified, or deleted content sync, every time the sync job runs, it will process only objects added, modified, or deleted since the last crawl. Incremental crawls can help reduce runtime and cost when used with datasets that append new objects to existing data sources on a regular basis.
- For Sync run schedule, choose Run on demand.
- Choose Next.


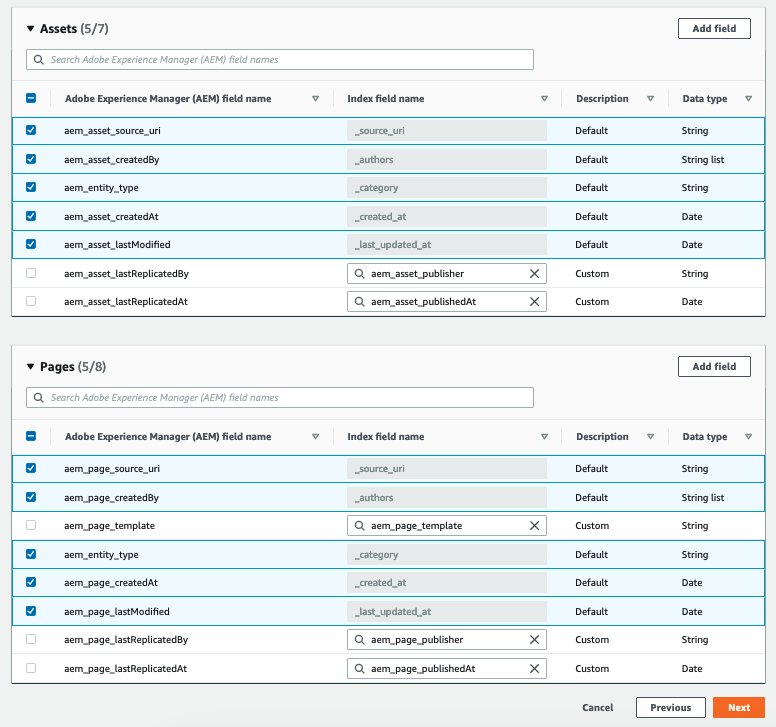
- In the Set field mappings section, you can optionally select from the Amazon Kendra generated default data source fields you want to map to your index. To add custom data source fields, choose Add Field to create an index field name to map to and the field data type. Specify the AEM field name, index field name, and data type.

- Choose Next.
- Review your settings and choose Add data source.

- After the data source is added, choose Data sources in the navigation pane, select the newly added data source, and choose Sync now to start data source synchronization with the Amazon Kendra index.

The sync process will depend on the amount of data to be crawled.
Now let’s enable access control for the Amazon Kendra index.
- In the navigation pane, choose your index.
- On the User access control tab, choose Edit settings.

- Change the settings to look like the following screenshot.
- Choose Next.

- Choose Update.

Wait a few minutes for the index to get updated by the changes. Now let’s see how you can perform intelligent search with Amazon Kendra.
Perform intelligent search with Amazon Kendra
Before you try searching on the Amazon Kendra console or using the API, make sure that the data source sync is complete. To check, view the data sources and verify if the last sync was successful.

Now we’re ready to search our index.
- On the Amazon Kendra console, navigate to the index and choose Search indexed content in the navigation pane.
- Let’s query the index using “What was the impact of Siberian heat wave?” without providing an access token.
Based on our access control settings in the index, a valid access token is needed to access content the user is allowed to see; therefore, when we use this search query without setting any user name or group, no results are returned.

- Next, choose Apply Token and set the user name or user email ID (for example,
[email protected]) that has access to AEM content.
While crawling the AEM data source, the connecter would set the user email ID as principal. If user’s email ID is not available, then the user name would be set as a principal.
The following screenshot shows an example with the user email ID [email protected] set as principal.

The following example uses user name user-dev-2 set as principal.

- Now, let’s try to search the same content with the token of user
[email protected], who is not authorized to view this specific document that appeared in the preceding query results.

This confirms that documents ingested by the Amazon Kendra connector for AEM honors the ACLs set by and within AEM and these same ACLs are being enforced on the search results based on applied token.
Clean up
To avoid incurring future costs, clean up the resources you created as part of this solution. If you created a new Amazon Kendra index while testing this solution, delete it. If you only added a new data source using the Amazon Kendra connector for AEM, delete that data source.
Conclusion
With the Amazon Kendra Adobe Experience Manager connector, your organization can search pages and assets securely using intelligent search powered by Amazon Kendra.
To learn more about the Amazon Kendra connector for AEM, refer to Adobe Experience Manager.
For more information on other Amazon Kendra built-in connectors to popular data sources, refer to Amazon Kendra native connectors.
About the Authors
 Praveen Edem is a Senior Solutions Architect at Amazon Web Services. He works with major financial services customers, architecting and modernizing their critical large-scale applications while adopting AWS services. He specializes in serverless and container-based workloads. He has over 20 years of IT experience in application development and software architecture.
 Manjula Nagineni is a Senior Solutions Architect with AWS based in New York. She works with major financial service institutions, architecting and modernizing their large-scale applications while adopting AWS Cloud services. She is passionate about designing big data workloads cloud-natively. She has over 20 years of IT experience in software development, analytics, and architecture across multiple domains such as finance, manufacturing, and telecom.
 Omkar Phadtare is a Software Development Engineer at Amazon Web Services, with a deep-rooted passion for cloud computing. Leveraging his technical expertise and strong understanding of the domain, he designs, develops, and implements cutting-edge, highly scalable, and resilient cloud-based solutions for a diverse range of modern businesses and organizations.
 Vijai Gandikota is a Senior Product Manager for Amazon Kendra at Amazon Web Services, responsible for launching Amazon Kendra connectors, Principal Store, Search Analytics Dashboard, and other features of Amazon Kendra. He has over 20 years of experience in designing, developing, and launching products in AI and analytics.
- SEO Powered Content & PR Distribution. Get Amplified Today.
- PlatoData.Network Vertical Generative Ai. Empower Yourself. Access Here.
- PlatoAiStream. Web3 Intelligence. Knowledge Amplified. Access Here.
- PlatoESG. Automotive / EVs, Carbon, CleanTech, Energy, Environment, Solar, Waste Management. Access Here.
- PlatoHealth. Biotech and Clinical Trials Intelligence. Access Here.
- ChartPrime. Elevate your Trading Game with ChartPrime. Access Here.
- BlockOffsets. Modernizing Environmental Offset Ownership. Access Here.
- Source: https://aws.amazon.com/blogs/machine-learning/intelligently-search-adobe-experience-manager-content-using-amazon-kendra/

