In computer vision (CV), adding tags to identify objects of interest or bounding boxes to locate the objects is called labeling. It’s one of the prerequisite tasks to prepare training data to train a deep learning model. Hundreds of thousands of work hours are spent generating high-quality labels from images and videos for various CV use cases. You can use Amazon SageMaker Data Labeling in two ways to create these labels:
- Amazon SageMaker Ground Truth Plus – This service provides an expert workforce that is trained on ML tasks and can help meet your data security, privacy, and compliance requirements. You upload your data, and the Ground Truth Plus team creates and manages data labeling workflows and the workforce on your behalf.
- Amazon SageMaker Ground Truth – Alternatively, you can manage your own data labeling workflows and workforce to label data.
Specifically, for deep learning-based autonomous vehicle (AV) and Advanced Driver Assistance Systems (ADAS), there is a need to label complex multi-modal data from scratch, including synchronized LiDAR, RADAR, and multi-camera streams. For example, the following figure shows a 3D bounding box around a car in the Point Cloud view for LiDAR data, aligned orthogonal LiDAR views on the side, and seven different camera streams with projected labels of the bounding box.

AV/ADAS teams need to label several thousand frames from scratch, and rely on techniques like label consolidation, automatic calibration, frame selection, frame sequence interpolation, and active learning to get a single labeled dataset. Ground Truth supports these features. For a full list of features, refer to Amazon SageMaker Data Labeling Features. However, it can be challenging, expensive, and time-consuming to label tens of thousands of miles of recorded video and LiDAR data for companies that are in the business of creating AV/ADAS systems. One technique used to solve this problem today is auto-labeling, which is highlighted in the following diagram for a modular functions design for ADAS on AWS.

In this post, we demonstrate how to use SageMaker features such as Amazon SageMaker JumpStart models and asynchronous inference capabilities along with Ground Truth’s functionality to perform auto-labeling.
Auto-labeling overview
Auto-labeling (sometimes referred to as pre-labeling) occurs before or alongside manual labeling tasks. In this module, the best-so-far model trained for a particular task (for example, pedestrian detection or lane segmentation) is used to generate high-quality labels. Manual labelers simply verify or adjust the automatically created labels from the resulting dataset. This is easier, faster and cheaper than labeling these large datasets from scratch. Downstream modules such as the training or validation modules can use these labels as is.
Active learning is another concept that is closely related to auto-labeling. It’s a machine learning (ML) technique that identifies data that should be labeled by your workers. Ground Truth’s automated data labeling functionality is an example of active learning. When Ground Truth starts an automated data labeling job, it selects a random sample of input data objects and sends them to human workers. When the labeled data is returned, it’s used to create a training set and a validation set. Ground Truth uses these datasets to train and validate the model used for auto-labeling. Ground Truth then runs a batch transform job to generate labels for unlabeled data, along with confidence scores for new data. Labeled data with low confidence scores is sent to human labelers. This process of training, validating, and batch transform is repeated until the full dataset is labeled.
In contrast, auto-labeling assumes that a high-quality, pre-trained model exists (either privately within the company, or publicly in a hub). This model is used to generate labels that can be trusted and used for downstream tasks such as label verification tasks, training, or simulation. This pre-trained model in the case of AV/ADAS systems is deployed onto the car at the edge, and can be used within large-scale, batch inference jobs on the cloud to generate high-quality labels.
JumpStart provides pretrained, open-source models for a wide range of problem types to help you get started with machine learning. You can use JumpStart to share models within your organization. Let’s get started!
Solution overview
For this post, we outline the major steps without going over every cell in our example notebook. To follow along or try it on your own, you can run the Jupyter notebook in Amazon SageMaker Studio.
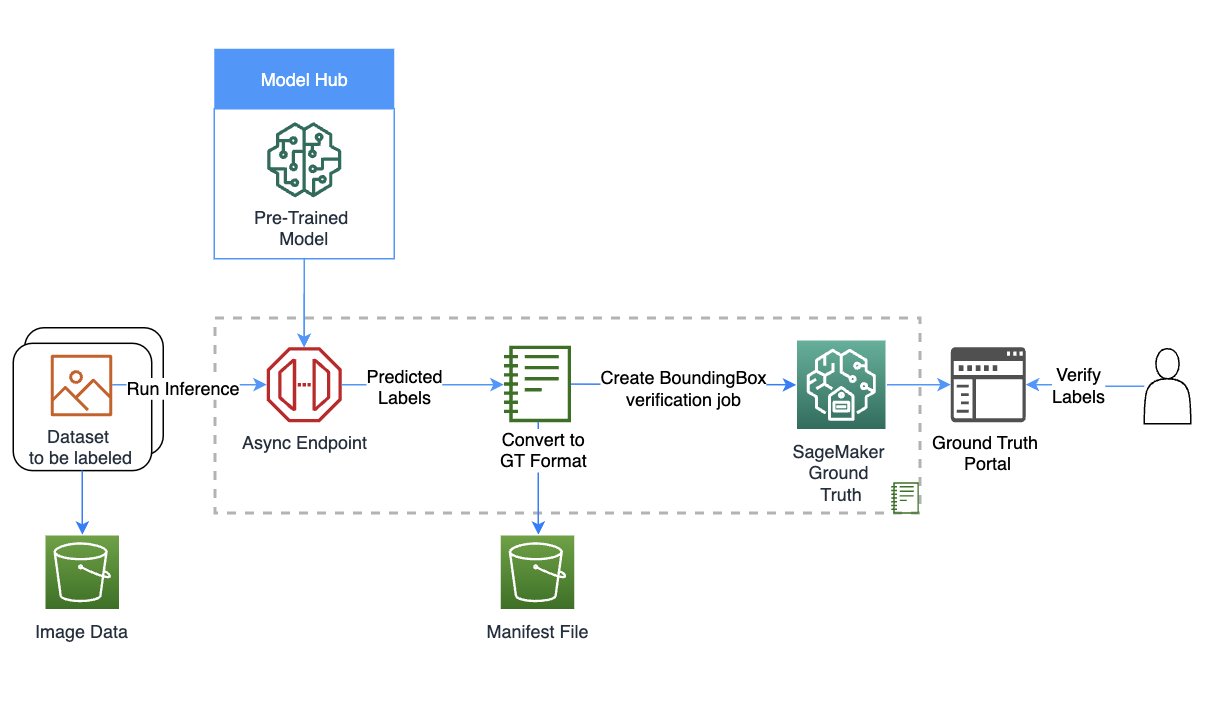
The following diagram provides a solution overview.
Set up the role and session
For this example, we used a Data Science 3.0 kernel in Studio on an ml.m5.large instance type. First, we do some basic imports and set up the role and session for use later in the notebook:
Create your model using SageMaker
In this step, we create a model for the auto-labeling task. You can choose from three options to create a model:
- Create a model from JumpStart – With JumpStart, we can perform inference on the pre-trained model, even without fine-tuning it first on a new dataset
- Use a model shared via JumpStart with your team or organization – You can use this option if you want to use a model developed by one of the teams within your organization
- Use an existing endpoint – You can use this option if you have an existing model already deployed in your account
To use the first option, we select a model from JumpStart (here, we use mxnet-is-mask-rcnn-fpn-resnet101-v1d-coco. A list of models is available in the models_manifest.json file provided by JumpStart.
We use this JumpStart model that is publicly available and trained on the instance segmentation task, but you are free to use a private model as well. In the following code, we use the image_uris, model_uris, and script_uris to retrieve the right parameter values to use this MXNet model in the sagemaker.model.Model API to create the model:
Set up asynchronous inference and scaling
Here we set up an asynchronous inference config before deploying the model. We chose asynchronous inference because it can handle large payload sizes and can meet near-real-time latency requirements. In addition, you can configure the endpoint to auto scale and apply a scaling policy to set the instance count to zero when there are no requests to process. In the following code, we set max_concurrent_invocations_per_instance to 4. We also set up auto scaling such that the endpoint scales up when needed and scales down to zero after the auto-labeling job is complete.
Download data and perform inference
We use the Ford Multi-AV Seasonal dataset from the AWS Open Data Catalog.
First, we download and prepare the date for inference. We have provided preprocessing steps to process the dataset in the notebook; you can change it to process your dataset. Then, using the SageMaker API, we can start the asynchronous inference job as follows:
This may take up to 30 minutes or more depending on how much data you have uploaded for asynchronous inference. You can visualize one of these inferences as follows:

Convert the asynchronous inference output to a Ground Truth input manifest
In this step, we create an input manifest for a bounding box verification job on Ground Truth. We upload the Ground Truth UI template and label categories file, and create the verification job. The notebook linked to this post uses a private workforce to perform the labeling; you can change this if you’re using other types of workforces. For more details, refer to the full code in the notebook.
Verify labels from the auto-labeling process in Ground Truth
In this step, we complete the verification by accessing the labeling portal. For more details, refer to here.
When you access the portal as a workforce member, you will be able to see the bounding boxes created by the JumpStart model and make adjustments as required.

You can use this template to repeat auto-labeling with many task-specific models, potentially merge labels, and use the resulting labeled dataset in downstream tasks.
Clean up
In this step, we clean up by deleting the endpoint and the model created in previous steps:
Conclusion
In this post, we walked through an auto-labeling process involving JumpStart and asynchronous inference. We used the results of the auto-labeling process to convert and visualize labeled data on a real-world dataset. You can use the solution to perform auto-labeling with many task-specific models, potentially merge labels, and use the resulting labeled dataset in downstream tasks. You can also explore using tools like the Segment Anything Model for generating segment masks as part of the auto-labeling process. In future posts in this series, we will cover the perception module and segmentation. For more information on JumpStart and asynchronous inference, refer to SageMaker JumpStart and Asynchronous inference, respectively. We encourage you to reuse this content for use cases beyond AV/ADAS, and reach out to AWS for any help.
About the authors
 Gopi Krishnamurthy is a Senior AI/ML Solutions Architect at Amazon Web Services based in New York City. He works with large Automotive customers as their trusted advisor to transform their Machine Learning workloads and migrate to the cloud. His core interests include deep learning and serverless technologies. Outside of work, he likes to spend time with his family and explore a wide range of music.
 Shreyas Subramanian is a Principal AI/ML specialist Solutions Architect, and helps customers by using Machine Learning to solve their business challenges using the AWS platform. Shreyas has a background in large scale optimization and Machine Learning, and in use of Machine Learning and Reinforcement Learning for accelerating optimization tasks.
- SEO Powered Content & PR Distribution. Get Amplified Today.
- PlatoData.Network Vertical Generative Ai. Empower Yourself. Access Here.
- PlatoAiStream. Web3 Intelligence. Knowledge Amplified. Access Here.
- PlatoESG. Automotive / EVs, Carbon, CleanTech, Energy, Environment, Solar, Waste Management. Access Here.
- BlockOffsets. Modernizing Environmental Offset Ownership. Access Here.
- Source: https://aws.amazon.com/blogs/machine-learning/auto-labeling-module-for-deep-learning-based-advanced-driver-assistance-systems-on-aws/

